This document is intended for Site Designers and Developers who are using Jomres.
Refers to Jomres v10.7.0
Jomres Site Designer and Developer guide
How do you find the override directory?
Property type specific templates
An example of overriding a template in a shortcode
Property type specific minicomponents
Upgrading after manually editing language files
You have strange text on your page after upgrading
How can you show properties with specific features?
How to run a Joomla Plugin in a Joomla Module
Shortcodes can use different template files
Including script content from one page in another Jomres template file
What's the difference between {jomres and {jomres_script ...?
Joomla Modules and WordPress shortcodes in Jomres template files
The get_property_module_data function
get_showtime('ePointFilepath')
Jomres_get_relative_path_to_file
Jomres Plugin example : Hello World
Jomres framework and Encryption/Decryption
Using Shortcodes code from minicomponents
Pulling rendered snippets in your own code
Cron Jobs for plugin developers
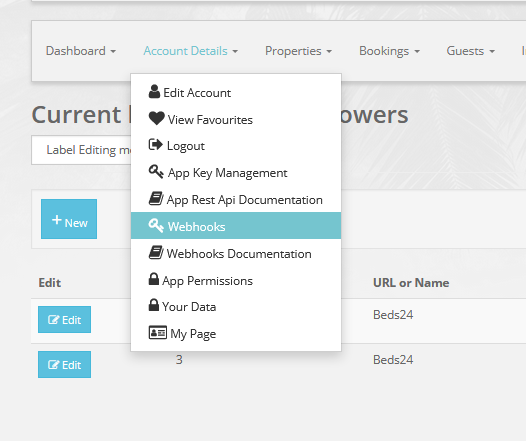
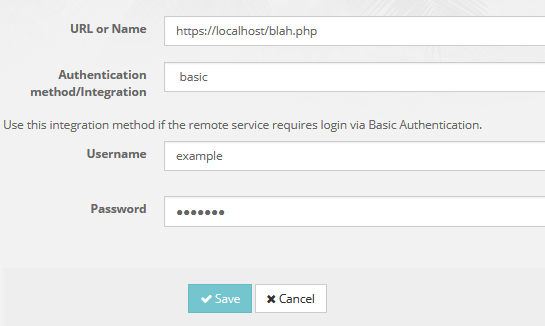
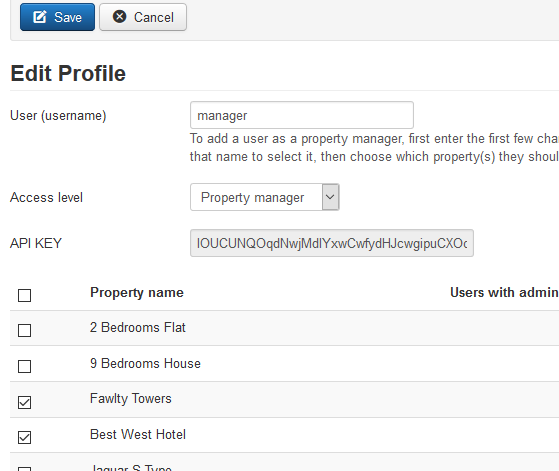
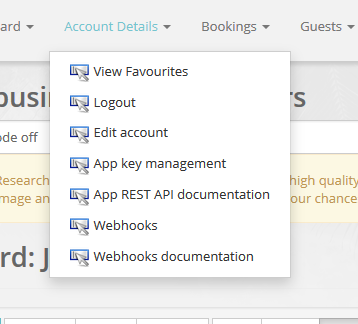
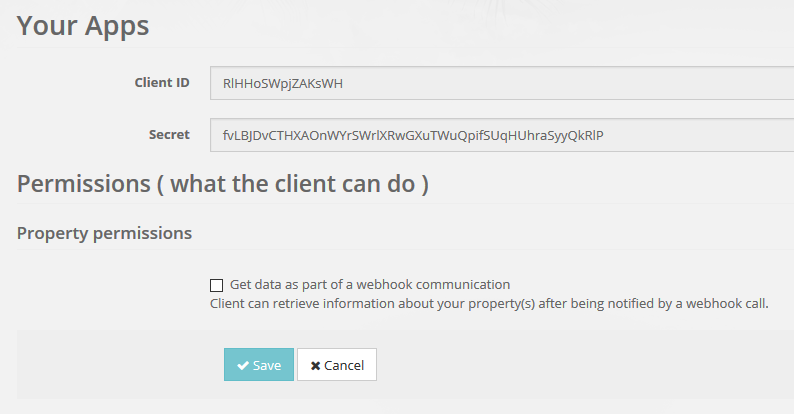
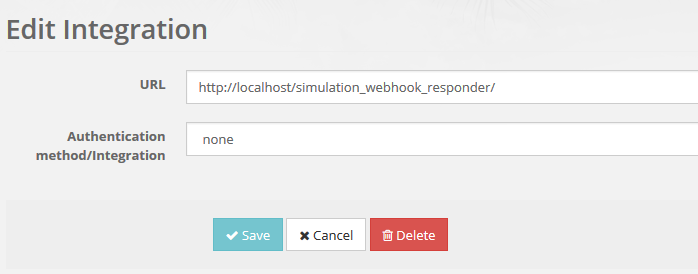
Creating Webhook Integration plugins
Webhooks - Anatomy of a webhook integration plugin
j00005webhooks_authmethod_none.class.php
j07300webhooks_auth_method_none.class.php
j07310watcher_authmethod_process_none.class.php OR j07320watcher_authmethod_process_none.class.php
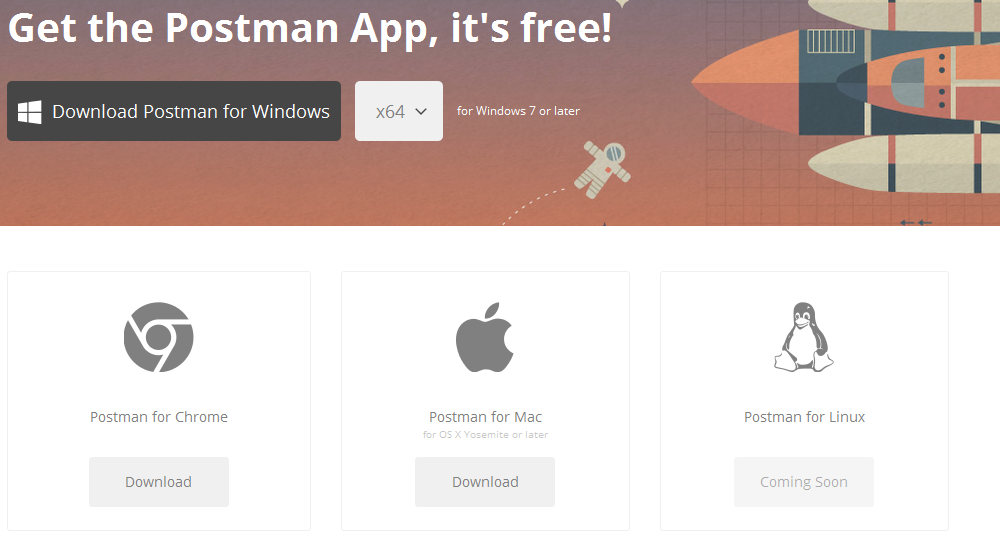
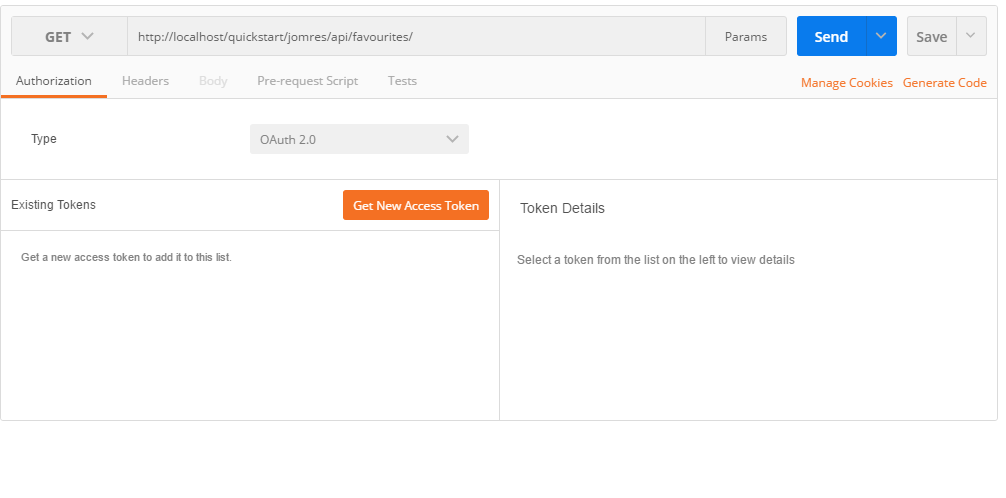
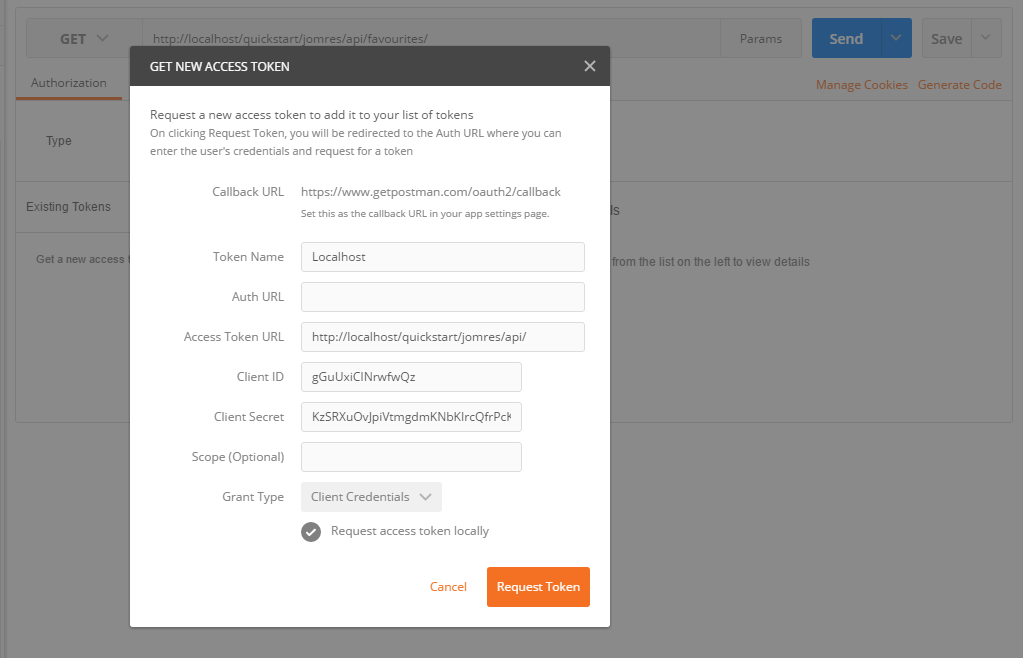
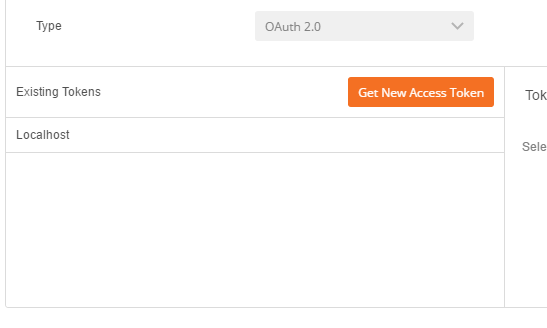
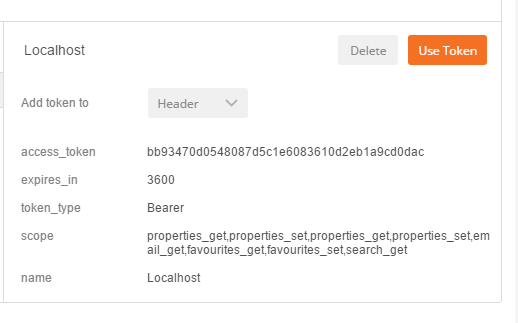
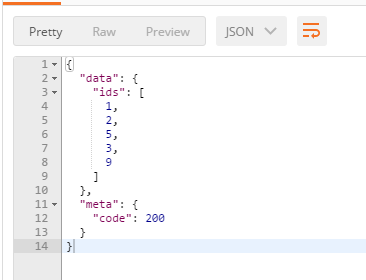
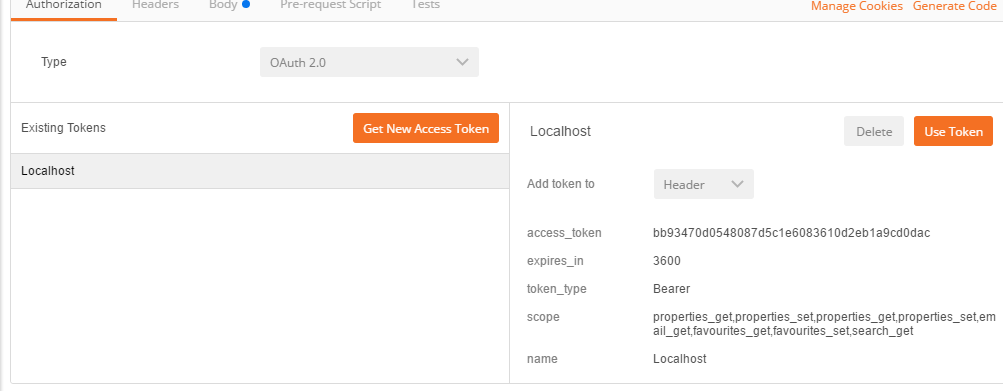
Using Postman to access the API
Communicating with the Jomres API
Anatomy of an API endpoint plugin
Using the REST API in your own software
Wordpress : API TEST page says I have to move files
How do I change the layout in a Jomres template file?
First, a really quick description of how the template system in Jomres works
Displaying multiple rows of repeating content
There is html markup here that I do not recognise
I want to show xxx in yyy.html template file. How do I do it?
Identifying individual templates
Vince's aide mémoire to making gateway plugins for Jomres
Brief explanation of each file and what it does
Final notes to gateway developers
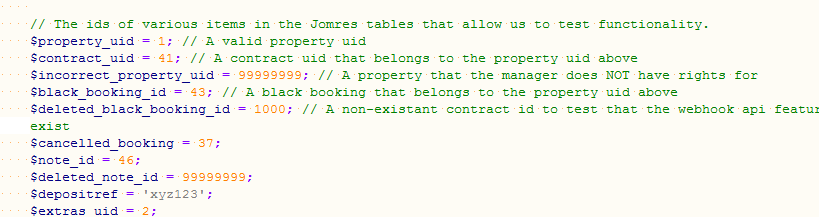
resource_type_gathering_trigger - 03379
resource_id_gathering_trigger - 03381
post_upload_processing_trigger - 03382
get_existing_images_trigger - 03383
Your role is to set up the look and/or feel of your Jomres site, either for yourself or somebody else.
This document will discuss various techniques you can use to get the most out of your Jomres installation. As a result it doesn’t provide a direct reference to menu options in Jomres, except in passing. If you need that, please see the Site Administrator’s guide.
The goal here is to pass on to you information that has been requested by other designers and developers, over the years. If you feel that some information is missing and you would like to see it in this document please don’t hesitate to contact me via the ticket system at https://tickets.jomres.net
There are four main sections to this document.
Later on in this document I’ll provide a short tutorial on the basics of creating a Hello World plugin, here I’ll discuss how you can find information about plugins and, if you’re a plugin developer, how to provide similar information for your users.
Plugins are a core part of Jomres. I initially came up with the mechanism to achieve this back in August of 2005, when Joomla was still Mambo. My main goal was always to find a way to provide new functionality for Jomres without having to do a new release every time I had a new idea. Since then it has evolved, but the fundamentals haven’t changed.
The main Jomres scripts, those delivered with Jomres Core, can be found in /jomres/core-minicomponents (because, initially they were installed using the Joomla Component Installer functionality).
Core plugins, i.e. plugins that are part of the Jomres package, once they’re installed can be found in /jomres/core-plugins.
Third party plugins can be found in /jomres/remote_plugins
For at least 10 years I maintained a section in the Jomres Manual site that held information about various plugins. The problem was that changes could be made to a plugin, but documenting those changes could often be forgotten if I was modifying several different plugins at the same time. To resolve this I came up with a more maintainable way to deliver information about the plugins you have installed on your Jomres based site.
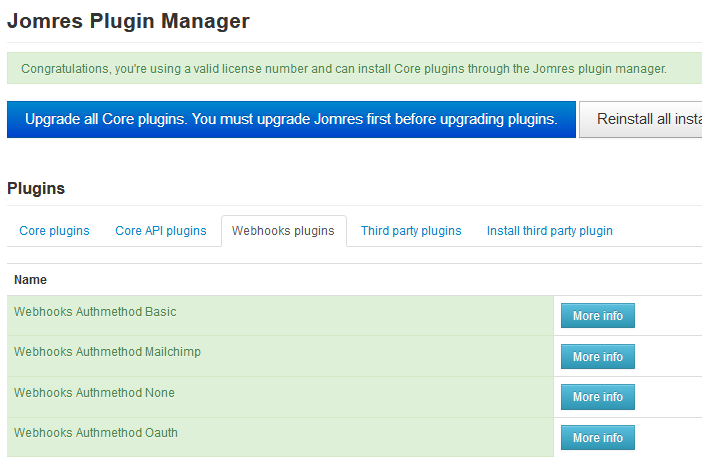
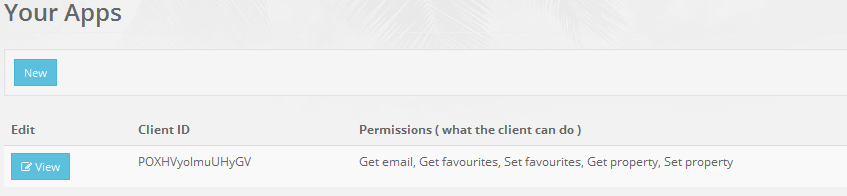
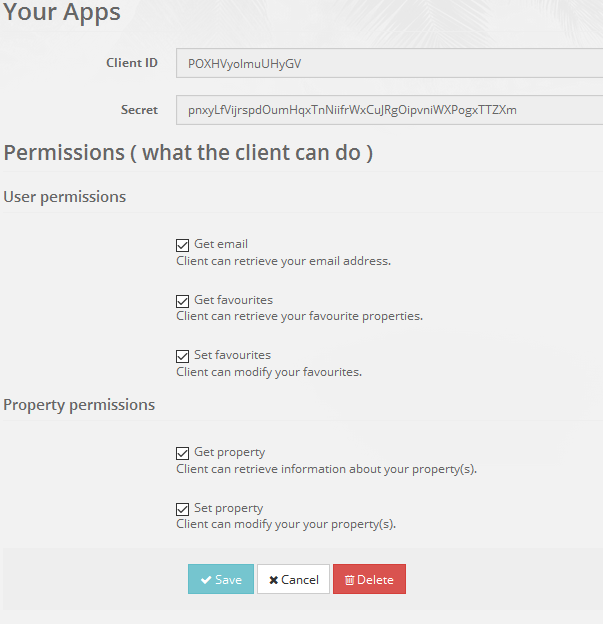
There’s a plugin in the Jomres Plugin Manager called Plugin Infos. It’s a free plugin, available to all so feel free to install it on your site. Important: Requires at least PHP8.0.
Once installed it adds a new menu item under Administrator > Jomres > Plugin Info
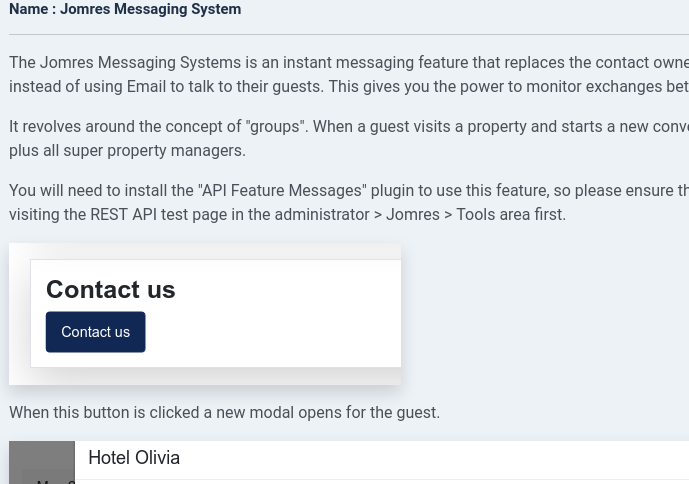
Visit this page and you will see a variety of buttons. In this example we’ll look at the Jomres Messaging System plugin.
Click on that button and scroll down to see information about the plugin.
Many plugins don’t need a large amount of information. They’ll just say something like “Use as a shortcode.” so visit the Administrator > Jomres > Tools > Shortcodes page for more information about a specific plugin. More information on shortcodes can be found in the Site Manager’s guide document.
Some however do contain a lot more information. The JMS plugin info for example discusses how you can show a login prompt because the JMS requires that a user be logged in before they can communicate with a property.
If you want to provide your own documentation for your plugins, you can do so by packaging a README.md file with your plugin.
This README.md file is parsed each time the registry is rebuilt (that’s either when a new plugin is installed/updated/deleted, once a day, or whenever you use the Rebuild Registry tool in Administrator > Jomres > Tools).
The markdown in these files is basic github markdown, with a handful of minor exceptions.
Images
To include an image in the markup use the following (example from Jomres Messaging System plugin)
{{img.png}} |
And put your image/images in the plugin’s /screenshots directory.
To include video, put videos in the plugin’s /videos directory. Here you’ll see an example from the isotope_properties plugin.
[[isotope.mp4]] |
Here we will discuss ways that you can modify Jomres to suit your own requirements.
Jomres, whilst it works fine 'out of the box' should nevertheless be seen as a toolkit. It’s extremely common for designers and developers to want to customise the layout (I’m not sure if that’s a comment on my design skills or not).
This section places a strong emphasis on advising you how to override files in an update safe way. This allows you to customise how Jomres works in such a way that you can update to new versions of Jomres without losing out your changes.
If you’re going to modify how it works, it is recommended that you read this section on the basic conventions used when customising Jomres.
As of Jomres 10.7 you can override virtually all of the code in Jomres Core and its plugins.
In previous versions of Jomres you would be encouraged to put your code into the /jomres/remote_plugins directory. This advice has now changed. Instead we would encourage you to locate your theme/template’s override directory and store your override files there. If you already have files/overrides in the /jomres_remote plugins directory there’s no need to move them. The 10.7 changes don’t affect existing functionality with respect to overriding those files, instead it builds upon it.
Your Joomla template exists in your site’s root directory/templates/TEMPLATENAME/. The Jomres override directory is under that in /html/com_jomres/
Example : /public_html/templates/TEMPLATENAME/html/com_jomres/
Your Wordpress theme exists in the /wp-content/themes/THEMENAME/ directory. The Jomres override directory is under that in /html/com_jomres/
Example : /wp-content/themes/THEMENAME/html/com_jomres/
In the rest of this document we will refer to this directory as the override_directory. Template files can be copied directly into the override_directory, whereas scripts and other files need to go into a subdirectory called ‘custom_code’ (override_directory/custom_code)
Jomres supports child templates/themes, and you are encouraged to use them.
If the directory does not initially exist, you can safely create it. If you want to override Jomres scripts, you will also need to create a subdirectory called custom_code ( /html/com_jomres/custom_code ).
There is a subset of directories that can exist in the override_directory/ directory which correspond to property type IDs, so if I have a property type of 2 (in a default Jomres installation that would be for Car property types) then in that directory override_directory/2/ I can put Jomres template files and Minicomponent scripts that will only be called when the property being shown is a car.
If you would like to edit some of the core Jomres functionality, for a large part this can be done easily in a way that is upgrade safe (i.e. will not be overwritten by an upgrade of Jomres). Many techniques are discussed at length in other sections, but to summarise :
The two biggest items that our users customise in Jomres are languages and template files. Languages are addressed elsewhere, so here we will talk about what to do if you want to modify Jomres template files.
I need to point out that these template files aren’t like template/theme files in Joomla or WordPress. You cannot include PHP in them. All dynamic data that is used to populate template files is collected in a calling script and put into PHP arrays, which are then handed to the patTemplate class which in turn uses the template file to generate the output.
I’m going to assume that I don’t need to tell you how to navigate to a subdirectory and physically edit files.
Jomres Core templates reside in the /jomres/assets/templates directory.
You can see an example here https://github.com/WoollyinWalesIT/jomres/blob/master/assets/templates/bootstrap5/frontend/top.html
There are two types of overrides; basic template overrides, and template packages.
Copy the Jomres template file you want to customise ( e.g. basic_module_output.html ) into the override_directory for your Wordpress theme or Joomla template and Jomres will use that template instead of the Core copy (create the parent directories if required).
These directories are not overwritten when Jomres is updated, therefore any time you edit a template file, your customisations are mostly safe, however occasionally a Joomla template or WordPress theme update can overwrite those changes. Child themes make this less of a problem, but not everybody knows about or wants to use them.
In the override directory you can create a sub-directory with a number. That number can correspond to a property type id in Jomres. Templates placed in that directory will then be used if the property being shown is of that property type id.
For example, if you create a sub-directory of 6 (in a default installation of Jomres, this is the Villa property type id), and then copy property_details.html into that directory, you will now have a custom version of property details that will be used if the property being shown is a Villa type property.
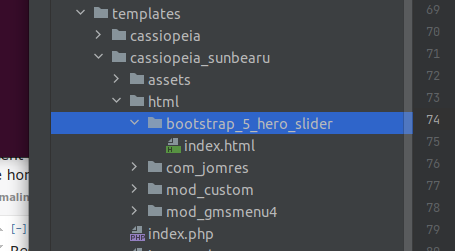
In the /override_directory/ create a subdirectory with the same name as the plugin, so if you’re overriding the Bootstrap 5 Hero Slider plugin then you would copy the index.html file from the plugin’s directory in /jomres/core-plugins to the html directory of the theme/template.
>= Jomres 10.6
Shortcode overrides are a little like basic overrides. They require that you know which template file(s) are used when a shortcode is used, but they are a powerful addition that arrived in Jomres 10.6.
They are used to tell a shortcode that it should use a different template file, and not the default.
Sounds complicated? It’s not really. Let me give you an example.
Let’s look at the show_rooms.html template file.
This is one of the template files that is used on the Property Details page. That page uses a shortcode ( {jomres_script show_property_rooms PROPERTY_UID=N} ) to output the rooms list. show_rooms.html is written to display rooms in rows because in the property details page, they’re in a column and this is the best layout in that location.
In this scenario I want to show the rooms on a page of their own, as well as in Property Details, but instead of rows one room wide, I want to show three rooms (columns) to a row. In show_rooms.html I can easily change the first instance of
<div class="col-sm-12">
To
<div class="col-sm-4">
However if I do that, the rooms list in Property Details won’t look right, they’ll all be squished up.
What I can do is put a shortcode like
{jomres show_property_rooms &property_uid=1}
in an article, and then copy show_rooms.html into the override_directory, and rename it to something unique like show_rooms_cols.html and change col-sm-12 to col-sm-4 in that file.
I can then modify the shortcode like this
{jomres show_property_rooms &property_uid=1&show_rooms.html=show_rooms_cols.html}
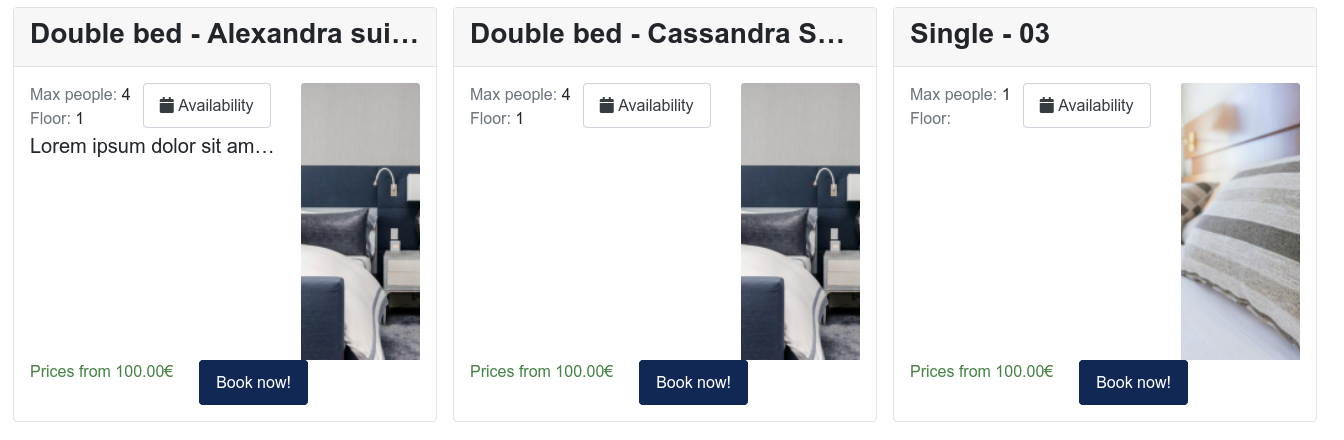
And the layout will look something like this
It’s still not perfect, I’ll need to play around with the markup in show_rooms_cols.html to improve how it looks, but now I have a unique layout on a different page, without spoiling the layout in the property details page.
You could use exactly the same technique with other shortcodes, including plugins like the Search Form Elements plugin to have multiple forms with different layouts/markup.
This is a relatively simple example of a powerful feature. You can have as many shortcodes as you like, each pointing to different template files. It’s useful because you don’t need to edit any code to achieve different results from the same source script. Just edit the html in the override template file and you’re in business.
If you make a typo in the name of the override template file, Jomres will fall back to using the original template instead.
Template override packages are a little used feature of Jomres that you can potentially use to distribute different layouts for Jomres. See here for more information.
You can copy a file (with the jnnnnnxxxx.class.php naming pattern) from /jomres/core-minicomponents or plugins in /jomres/ core-plugins into the override_directory/custom_code directory. Once you have done that, you will need to visit the
Administrator > Jomres > Tools > Rebuild minicomponent registry page. Once you have done that Jomres will use the new script instead of the one in /jomres/core-minicomponents.
>= Jomres 10.7.0
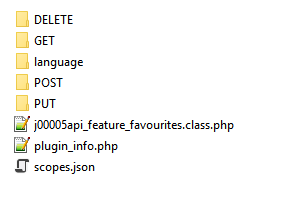
From Jomres 10.7 you are able to have property type specific minicomponents (updated version of the plugin manager is required).
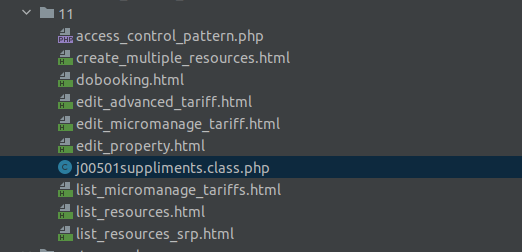
In this example screenshot, we have a property type 11 (Tool Hire Centre)
Having the Single Person Supplements configuration tab in the business configuration page doesn’t make sense, so we’ll create a copy of j00501suppliments.class.php in that directory, remove the settings completely so that the constructor just contains
public function __construct($componentArgs)
{
// Must be in all minicomponents. Minicomponents with templates that can contain editable text should run $this->template_touch() else just return
$MiniComponents = jomres_singleton_abstract::getInstance('mcHandler');
if ($MiniComponents->template_touch) {
$this->template_touchable = false;
return;
}
return;
}
And rebuild the registry.
Now we’ve removed the Supplements tab for properties of type 11.
The main reason for adding this functionality is to allow site developers to tweak the property configuration tabs for individual property types. That said, you are not limited to customising just tabs, you can have customised versions of minicomponents for any property type.
>= Jomres 10.7.0
Most Jomres function files exist in the functions directory at
https://github.com/WoollyinWalesIT/jomres/tree/master/libraries/jomres/functions
Some are CMS specific and can be found here https://github.com/WoollyinWalesIT/jomres/tree/master/libraries/jomres/cms_specific in the relevant sub-directory, depending on your CMS, in the file called cms_specific_functions.php
You should not modify any of these files, otherwise you will have difficulty upgrading in the future.
Instead, you can create your own function override file in your theme/template html/com_jomres/custom_code/custom_functions.php file.
This file is included by Jomres before other function files, so you can put your customised versions of functions in there.
< Jomres 10.7.0
You can override class files by putting your customised class files into remote_plugins/custom_code
Once you have copied a file into there, remember to rebuild the registry in admin > Jomres > Tools menu.
>= Jomres 10.7.0
From Jomres 10.7.0 onwards you can additionally have custom versions of class files in the override_directory/custom_code/ directory.
>= Jomres 10.7.0
Jomres’ map styles are stored in
https://github.com/WoollyinWalesIT/jomres/tree/master/assets/map_styles
and configured in site configuration. You can copy a map style into the theme/template html/com_jomres/custom_code directory and rename it to custom_map_style.style to have your own map styles that aren’t overwritten by updates to Jomres.
Create a file called custom_jquery_ui.css in the override_directory/custom_code directory and Jomres will use that. Due to when it's called Jquery UI css declarations here will override the defaults.
Jomres CSS and Javascript files can be found in the /jomres/assets directory. You can override these by placing copies in the override_directory/custom_code directory.
Joomla only.
A custom copy of components/com_jomres/router/router.php can be put into the override_directory/custom_code directory and Jomres will use that instead of the default.
Additionally the code for scanning for the router.php file will look in both remote_plugins and core-plugins to see if there’s a file it can use, if there isn’t a copy in the override directory.
From Jomres v10.7
It is possible to dynamically set which tasks appear in the Jomres main menu based on the property type.
In the override directory create a subdirectory of the property type id (this is the same process as for having property type specific template files).
Create a file called access_control_pattern.php
It’s contents would look something like this.
// ################################################################
defined('_JOMRES_INITCHECK') or die('');
// ################################################################
$this->controlled['api_documentation'] = -2;
$this->controlled['oauth'] = -2;
$this->controlled['webhooks_core'] = -2;
$this->controlled['webhooks_core_documentation'] = -2;
The above example would prevent the REST API menu options from appearing and being accessible, even through the address bar of the browser.
The overrides mentioned in this document will also be used when using REST API endpoints. Most of them (templates/css/javascript) would not be used in that context, however classes, functions and the router will be used. When the REST API starts up it needs to detect the override directory, however for performance we don’t include any CMS frameworks at that point (and even if we did, Jooma will throw an error because there’s no template set on REST API calls). This means that the REST API code does its own thing to find the overrides.
To do this it’ll scan the theme or template directories looking for /html/com_jomres and if it finds one it’ll use the files found there. This means that if you’ve got two copies of /html/com_jomres in different directories it may be using the wrong set of files.
Bear that in mind.
Adding a new language file
See https://github.com/WoollyinWalesIT/example_language_plugin
The Jomres language files can be found in /jomres/languages. These strings are called into the code using the jr_define function like this
jr_define('_JOMRES_COM_MR_SHOWPROFILES','Show profiles'); |
You could edit that string to
jr_define('_JOMRES_COM_MR_SHOWPROFILES','List Users'); |
to change the button in the configuration panel from "Show profiles" to "List Users".
There are quite a lot of language definitions in Jomres, somewhere in the region of 2000+. New language definitions are always added to the end of the language files which makes it easy for users who have their own language files to find additions and add them to their language files.
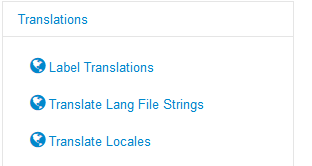
Whilst you can edit the language files, it's not the best way to translate Jomres, instead you should use the label translation and Translate Lang File Strings features in the administration area. These changes are saved to the database so it does not matter if Core language files are overwritten during an update because the database changes are not modified.
Read the Label Translations section of the Site Manager’s guide for more information.
If you do decide to edit the language files, then you'll need to back up your customised language files either by downloading your copy of the file, or creating a duplicate somewhere on the server, before you upgrade because Core language files are always overwritten. Once you have updated Jomres then you can copy that file back into /jomres/languages
You should not need to make your own language files for plugins. If you need to translate a specific label or labels the easiest way to do this is to visit the "Translate Lang File Strings" menu option in the administrator area and use the browser's search feature to search for the string in that page.
You need to be careful when editing language files. A common problem is where French language users (who commonly use the ' (single quote) accidently introduce errors such as the following (My French is terrible, so translation examples will be in English).
jr_define('_JOMRES_COM_MR_SHOWPROFILES','Show p'rofiles'); |
The above string will cause a fatal error within PHP because the ' after the "p" has cut short the string to "Show p" and PHP cannot parse the "rofiles" afterwards in a meaningful way.
If you find yourself creating this problem, there are two ways to rewrite the line to make it work correctly. You could either wrap the entire string in " (double quotes) or escape the single quote using the \ symbol. Following are both working examples.
jr_define('_JOMRES_COM_MR_SHOWPROFILES',"Show p'rofiles"); |
This scenario addresses a common issue that users experience after upgrading.
After an upgrade you may see new areas in your Jomres pages, but instead of a string like "Advanced site config" you see something like _JOMRES_COM_ADVANCED_SITE_CONFIG.
This can happen if users do not use the label translation feature and instead copy the updated language file with an older language file that’s missing new definitions.
New definitions are always added to the end of the language file, so you can copy the missing strings from the end of the Core language file into your special language file if you want to continue using the special language file.
Jomres >= 10.7
Older versions of Jomres had this feature and in 10.7 it has been revived, updated and improved.
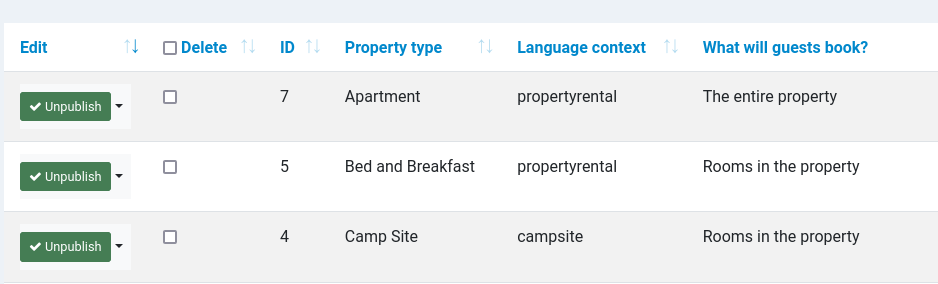
In the List Property Types page you will see this
Note the Language context Column.
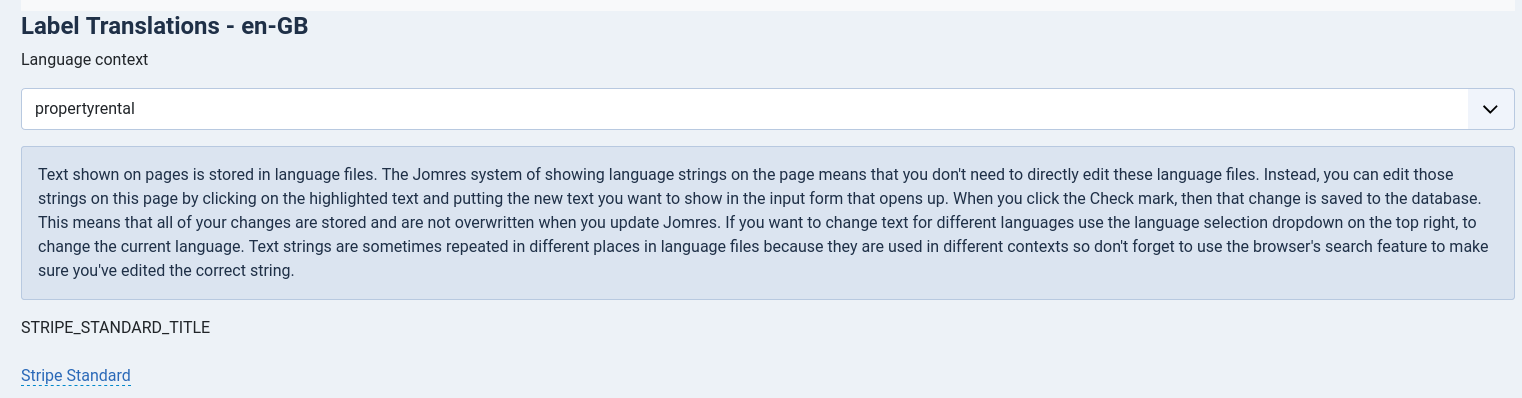
This column corresponds to a new dropdown in the Translate Lang File Strings page
When you change this dropdown, then customise labels, the customisations are then associated with that property type.
This allows you to have different language strings for different property types. Compare these two screenshots, the first is for a Hotel property type , the second for a Tool Hire Centre type.
The language context being used by shortcodes may not always be the one you would expect. That’s due to factors such as if another shortcode has already loaded a language file for another property type. If that happens, you can tell a shortcode to use a specific context.
In this example we’ve configured the Search Form Elements form start shortcode to ensure that it uses language strings for the propertyrental context.
{jomres search_form_start &language_context=propertyrental}
This section contains information likely to be of use to designers.
If you haven’t already, I strongly recommend that you read the Site Administrator’s guide first, particularly the section that refers to Bootstrap versions. Jomres has its own template files. These are different to (WordPress) themes and (Joomla) templates. These Jomres template files are sets of templates, each of which is designed to work with Bootstrap 2, Bootstrap 3 and Bootstrap 5.
When working with Jomres template files you need to be aware of which version of Bootstrap your particular installation is Jomres configured to work with. When you know that, you’ll know which Jomres Template Set is being used by Jomres to generate output.
Jomres relies on the Fontawesome icon set for displaying icons, therefore it’s necessary that the CMS’s template/theme provides a link to the Fontawesome icon set.
The Jomres Leohtian (Bootstrap 3) Theme (WordPress) and Template (Joomla) uses the Fontawesome 4.7 icon set.
Sunbearu (Bootstrap 5) uses Fontawesome 6.1.1
The different icon sets use different names, as an example see the property star for the BS3 template set, compared to the BS5 template set
class="fa fa-star" |
class="fas fa-star" |
One uses “fa… and the other users “fas…
It may be that you decide that you prefer the layout of one Jomres template from the Bootstrap 5 template set, or want to use a Bootstrap 5 only plugin and use it in a Jomres installation that’s configured to use its Bootstrap 3 template set.
For many Bootstrap 5 only plugins, the only major difference is that they don’t contain a Bootstrap 3 template set. It is, therefore, possible for you to use a BS5 plugin on a BS3 site by using the template override feature and dropping the existing BS5 templates into an override directory in the child theme/template plugin_name subdirectory. If you choose to do that, please be aware that you will then need to modify those template files so that they use the older Fontawesome 4.7 icons, and not the Fontawesome 6 icons.
Online links :
FA 4.7 https://fontawesome.com/v4/icons/
FA 6.1 https://fontawesome.com/v6/search?m=free
Documentation about the Jomres Search Widget plugin has been removed from this area of the documentation. The plugin has been superseded by the Search Form Elements plugin which we believe is much more flexible. We will leave the Search Widget plugin in the plugin manager for now, but you are not encouraged to use it. Instead, use the Search Form Elements plugin, and install the Search Form Elements Guide and Search Form Elements Forms plugins for information on how to use Search Form Elements.
To use Shortcodes you will need to install a special plugin. If you are using Joomla, install the "jomres_asamodule_mambot" plugin, and Wordpress users will need to install the "jomres_shortcodes". Both are available at the bottom of the page in the Jomres Plugin Manager.
NB : Joomla users - If you install the Jomres ASAModule Mambot plugin through the Jomres plugin manager you may need to visit Extensions > Manage > Discover to force Joomla to properly install that plugin. If you do, please remember to enable the plugin afterwards in the plugin list.
NB: WordPress users - Once you have installed the Jomres Shortcodes plugin, remember to activate it afterwards in the WordPress plugins page.
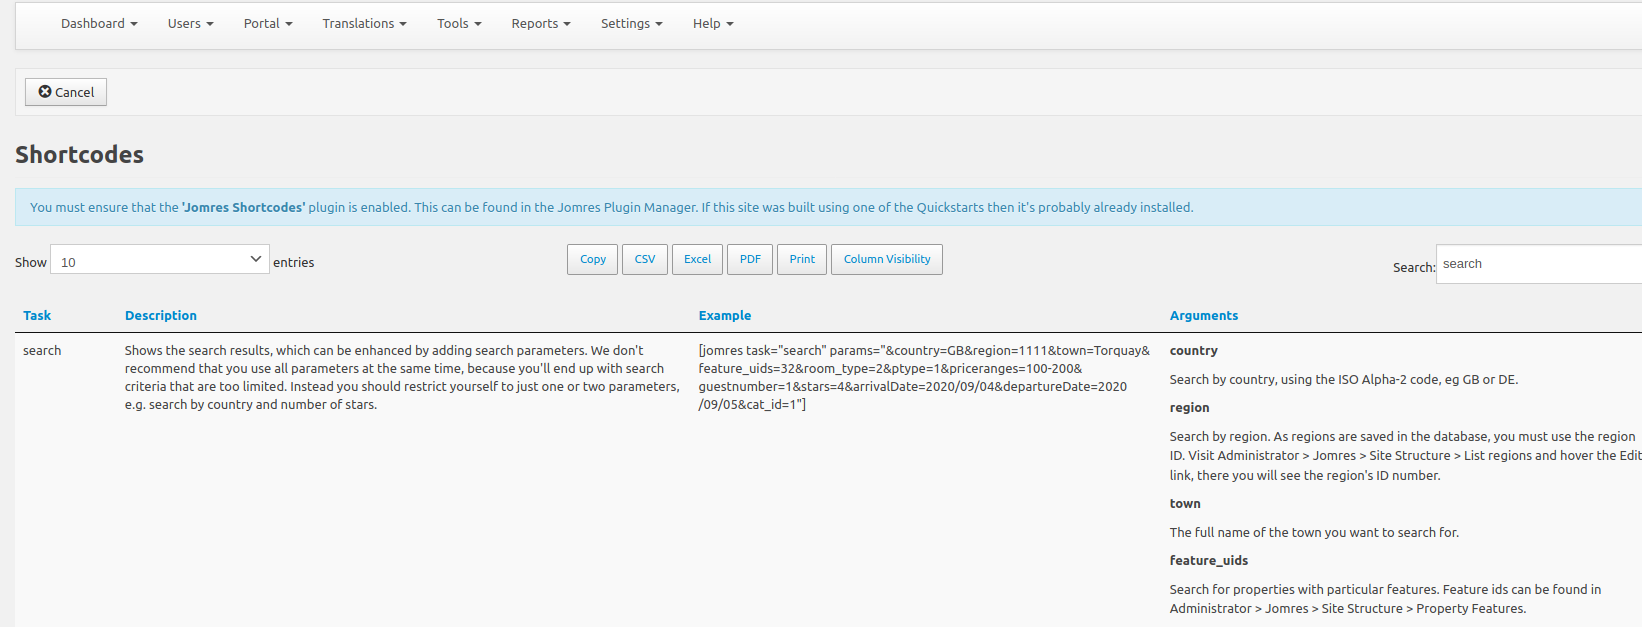
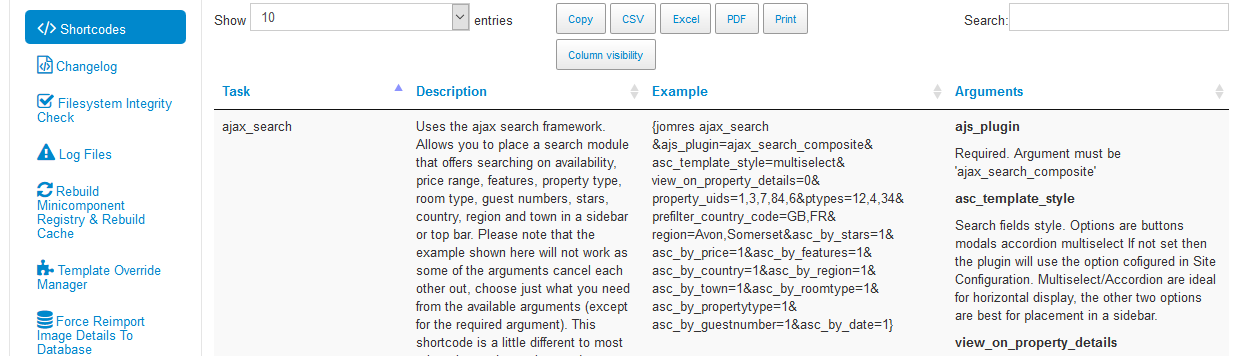
Different systems will have different plugins installed, therefore it’s not practical to include a list of shortcodes in this document. To see a definitive list of shortcodes available to your installation, visit the Administrator > Jomres > Developer tools > Shortcodes page in your Jomres installation.
In this tutorial I will show you how to add a page in Wordpress where a list of properties with a specific feature is shown. The process is the same in Joomla but the shortcode syntax is slightly different. To see the syntax, go to Administrator > Jomres > Tools > Shortcodes to see the available shortcodes.
If you use the "Search" box on the top right you can quickly find a shortcode, if you already know the task you want to add to the page.
The search shortcode example is a little confusing because it tries to show you all possible options, many of which might not be compatible with each other. This is what it gives you :
[jomres task="search" params=&country=GB®ion=1111&town=Torquay&feature_uids=32&room_type=2&ptype=1&priceranges=100-200&guestnumber=1&stars=4&arrivalDate=2020/09/04&departureDate=2020/09/05&cat_id=1] |
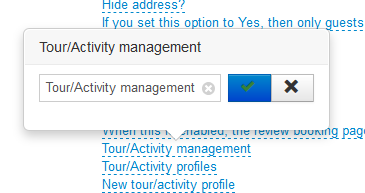
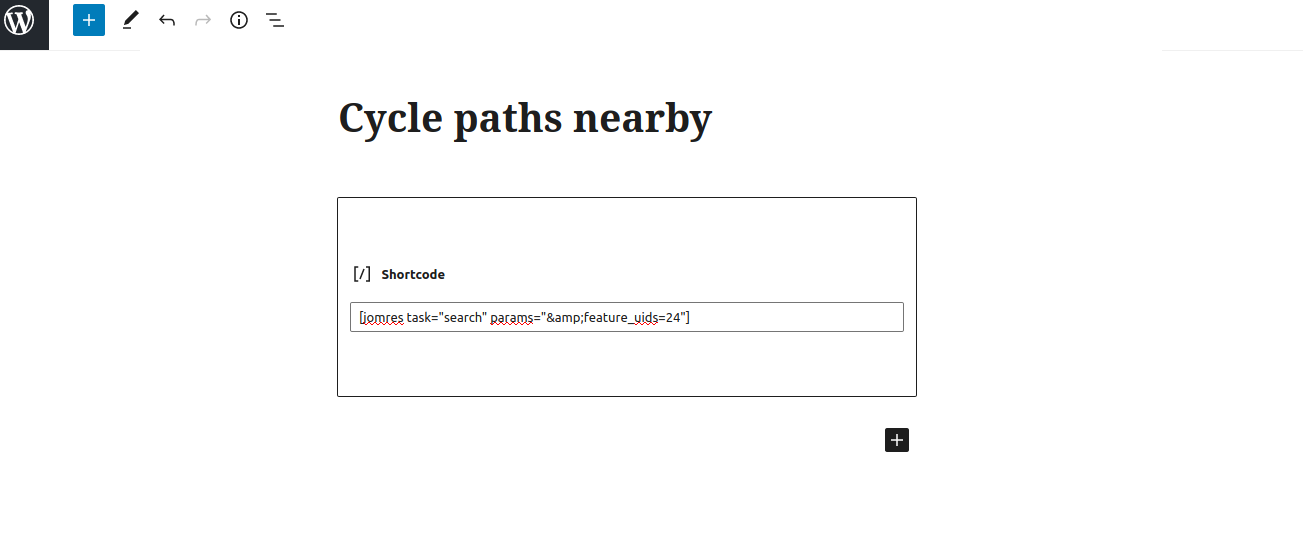
What we need to do is modify this shortcode to pick out just what we want so, next let's find the property feature we want to list properties by. In this article I want to list properties that have Cycle Paths nearby, so let's go to Admin > Jomres > Settings > Property Features.
Here you can see that the property feature's ID is 24, so we now know that we can modify the search shortcode in the page to this :
[jomres task=search params=&feature_uids=24] |
Let's create a new Wordpress page and add the shortcode :
Publish the page.
Now we need to go to Appearance > Menus
Click the Checkbox next to "Cycle paths nearby" and click Add to menu. Now you can click Save Menu.
As you can see in this screenshot the "SRP Standard" has the Cycle Paths feature therefore it's shown in the property list.
This quick article is designed to show you how easy it is to list properties based on their features. There's plenty else you can do with the "search" shortcode, for example
You can also combine search parameters, so to list properties from category 1 in region 1111 just make the parameters params=&cat_id=1®ion=1111
A recent ticket prompted me to write this quick article because I'd forgotten the details and had to relearn them myself.
Jomres Shortcodes are a relatively new (4 or 5 years) addition to Jomres, however the technology underpinning them is a lot older. In fact Shortcodes are an evolution of a feature called "Asamodule" which is used to pull discrete sections of Jomres output into a Joomla page.
In recent years I've found Jomres Shortcodes so easy to work with that Asamodule itself has been largely forgotten, mainly because the Shortcode term is better understood by both Joomla and Wordpress users. Shortcodes make it so that I can write one set of code that produces X output, and you get the same results in both Wordpress and Joomla, so when a Joomla user asked how to use the new Search Widget plugin with Asamodule I immediately asked "Why not do it as a Shortcode?" to which they replied "How?"
I tried it locally to make sure I wasn't handing out bad advice and it turns out that I'd forgotten a key ingredient of the recipe. The shortcode wasn't being rendered by the Joomla content modules. I had to have a dig on the 'net to refresh my memory.
A search term I used, which I expected results from and didn't get any was "Joomla plugin in module" so I'm going to put this here in case anybody else tries the same search as I did.
Once you know, you'll kick yourself. It's ludicrously simple.
To start with, I tested a shortcode in an article and attached that article to a menu, just to make sure it looked right.
{jomres search_widget &search_widget=vertical_dates_sleeps} |
The equivalent Wordpress shortcode would be [jomres task="search_widget" params=&search_widget=vertical_dates_sleeps]
Next I created a Joomla Module, and set the type to Custom.
I entered the same shortcode in the module's wysiwyg editor area, set the module position and then in the Options tab (Module/Menu assignment/Options/Advanced/Permissions) I needed to set the Prepare Content setting to Yes. Once you do that the module's content is passed through the Joomla content plugins, which is what we want.
Save the module, and that should be all you need to do. The shortcode content should appear in the module.
From Jomres 10.6
Shortcodes can now define custom templates. Example : {jomres XXXXX XXSOMEARGSXXXXX&basic_module_output.html=basic_module_output_circular.html}
If basic_module_output_circular.html exists in the override directory, it will be used instead. Allows individual shortcodes to be highly customised without needing to modify any code.
I've used this quite a lot in the new Quickstart, it allowed me to create customised versions of some Jomres template files and upload them to the override directory (in the case of the Quickstart that's /templates/cassiopeia_sunbearu/html/com_jomres).
To see what I mean, once you have installed the new Quickstart, take a look in Admin > Content > Site Modules and click on "Home Widgets - Circular images". This is a custom module with a Jomres shortcode that demonstrates this functionality.
Just remember, when you create a custom module with a Jomres shortcode, always set the Options tab > Prepare Content switch to Yes/On.
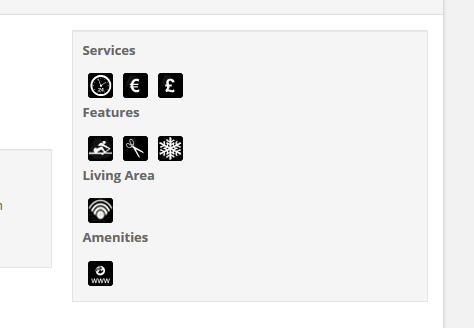
Consider this scenario :
You have the property list ( the result of a search, or the default page when Jomres is visited and the user isn't logged in ), and you want to include the property features list that you normally in the property details, in the property list panel for each property
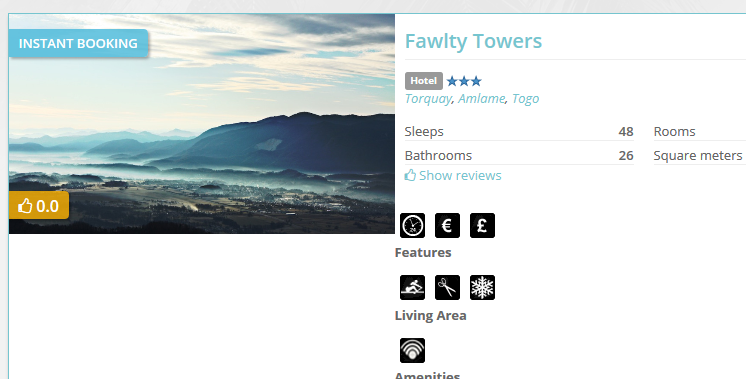
In this image we see the property features in the property details page.
I want to show this same information in the list properties, list view page, like this
When you install Jomres you will discover that it supports "Shortcodes", in the Mambo days they were called Mambots, in Joomla today they're called Content Plugins but in my view the word "plugin" is overused and confusing so I prefer the Wordpress term of Shortcode.
Virtually any individual Jomres script ( prefixed j0600Nxxxxx.class.php ) can be called through a shortcode, and the Jomres admin area shortcodes page shows you the shortcodes you can use. The following is an extreme example of the shortcodes, most of them are much simpler than this, but it gives you an idea of what you can expect to see.
The code to include the property features in an article looks like this
Normally these shortcodes are used in Joomla or Wordpress content articles to include information without having to modify any PHP scripts, but there's another way that they can be used.
You can use very similar code in the list_properties.html template file to call the same "show_property_features" content in that template :
{jomres_script show_property_features PROPERTY_UID={UID}} |
In this example the {UID} refers to the property uid as passed to the list_properties.html template from the calling script. When the section is rendered it will produce content like
{jomres_script show_property_features PROPERTY_UID=110} |
which is parsed by the template class to eventually produce the output in the second image in this section ( property features in the property list).
The first thing you need to be aware of is that with this code there's a danger of recursion. If you put one of these jomres_script shortcode elements into a template that will eventually include the same shortcode, you will end up with a situation where the template tries to render itself and before you know it the server's gotten very upset with you and will probably crash. So, do not include a call like {jomres_script viewproperty N} in anything, as this template includes lots of other templates to build up the final result.
Next, the {UID} mentioned in the previous example is a special case. Most of the time you can use just N in a template. What do I mean? Let me show you.
The above image is an example of a completely custom composite_property_details_notabs.html template. It's constructed entirely of these jomres_script shortcodes and html/bootstrap3 markup. The output isn't particularly pretty, it's not designed to be, instead it's an example of what you can achieve without making any script customisations whatsoever.
The "PROPERTY_UID=N" part of the shortcode argument replaces the "property_uid=10" that you see in the shortcodes description page in the administrator area. So long as the template you are modifying is designed to be used when viewing a specific property (I.E when property_uid=X is in the url ) then you can use "N". Otherwise you need to include the real property uid in the shortcode definition, such as the UID part as demonstrated in the first example in this article.
Note: the { and [ braces can both be used in Joomla. In WordPress you'd use [. If you're a WP user, just transpose { for [ in the rest of this post.
{jomres... is for CMS content, such as within WordPress articles or Joomla modules or articles, whereas {jomres_script... is for Jomres own content, typically Jomres template files.
Jomres has two plugins that will parse content generated by the CMS.
In Joomla that's "Jomres ASAModule Mambot", and in WordPress it's "Jomres Shortcodes".
These two plugins are custom for Joomla or WordPress but they behave in fundamentally the same way. They'll look for {jomres blahblah} shortcodes in CMS content and if they see it, they'll send the contents of the shortcode to Jomres to parse and produce output, which the plugins will then hand back to the CMS to display.
After a while of using these shortcodes I realised that I could do something similar in Jomres template files, meaning that I could just write a similar shortcode into a Jomres template file and Jomres would call itself and produce the same output, just as if it had been called by "Jomres asamodule mambot" or "Jomres Shortcodes". This saves a ton of work and simplifies things when you want to mix'n'match layout.
For a practical example see the Bootstrap 5 version of the property_details.html template file, which uses this feature (the older corresponding Bootstrap 3 and Bootstrap 2 templates don’t).
Determining how to set the property is a little complicated, and it's talked about under "Including script content from one page in another Jomres template file" however all you need to know is, if you're adding the shortcode to the property_details.html template use
PROPERTY_UID=N
and in every other Jomres template file, if the Property uid has already been determined by a calling script (e.g. the show property header script) use
&property_uid={PROPERTY_UID}
https://github.com/WoollyinWalesIT/jomres/blob/master/assets/templates/bootstrap5/frontend/list_properties.html
If you're using the shortcode in an article or module then you'll need to know beforehand what the property uid is and add that to the shortcode.
So, a shortcode in property_header.html looks like
{jomres_script show_property_slideshow &property_uid={PROPERTY_UID}&image_size=large&slideshow.html=slideshow_baguettebox.html}
whereas in property_details.html it looks like
{jomres_script show_property_slideshow PROPERTY_UID=N&image_size=large&slideshow.html=slideshow_baguettebox.html}
and in a CMS's article it would look something like
{jomres show_property_slideshow &property_uid=10&image_size=large&slideshow.html=slideshow_baguettebox.html}
There may come a time when you will decide that you want to include a Joomla module (for example the login form) or a WordPress shortcode in a Jomres template file.
From Jomres 10.5.4 you will be able to do that. The feature was developed because the Jomres Messaging System needs to import the CMS’s configured login forms into its own Jomres templates.
Let’s say, for example, you want to include the Joomla login form in a Jomres template file. The way you would do that is to first create a module in the Joomla module manager, something like this :
At the end of that row, you can see the module’s ID.
In the Jomres template file I can put this :
{module id=17} |
Admittedly this is a slightly silly example, but it serves its purpose. Putting that code into the list tariffs template, as you can see the Joomla breadcrumbs module is now included.
In WordPress the syntax is a bit different. It looks like
{module id=[default_wordpress_loginform redirect="http://www.domain.com"]} |
The ‘default_wordpress_loginform’ shortcode is a custom shortcode included in the Jomres WP plugin, it’s a vehicle for creating a shortcode for the WP login form, strangely WP doesn’t have a native one.
You should be able to do this with any WordPress shortcode, not just the login form.
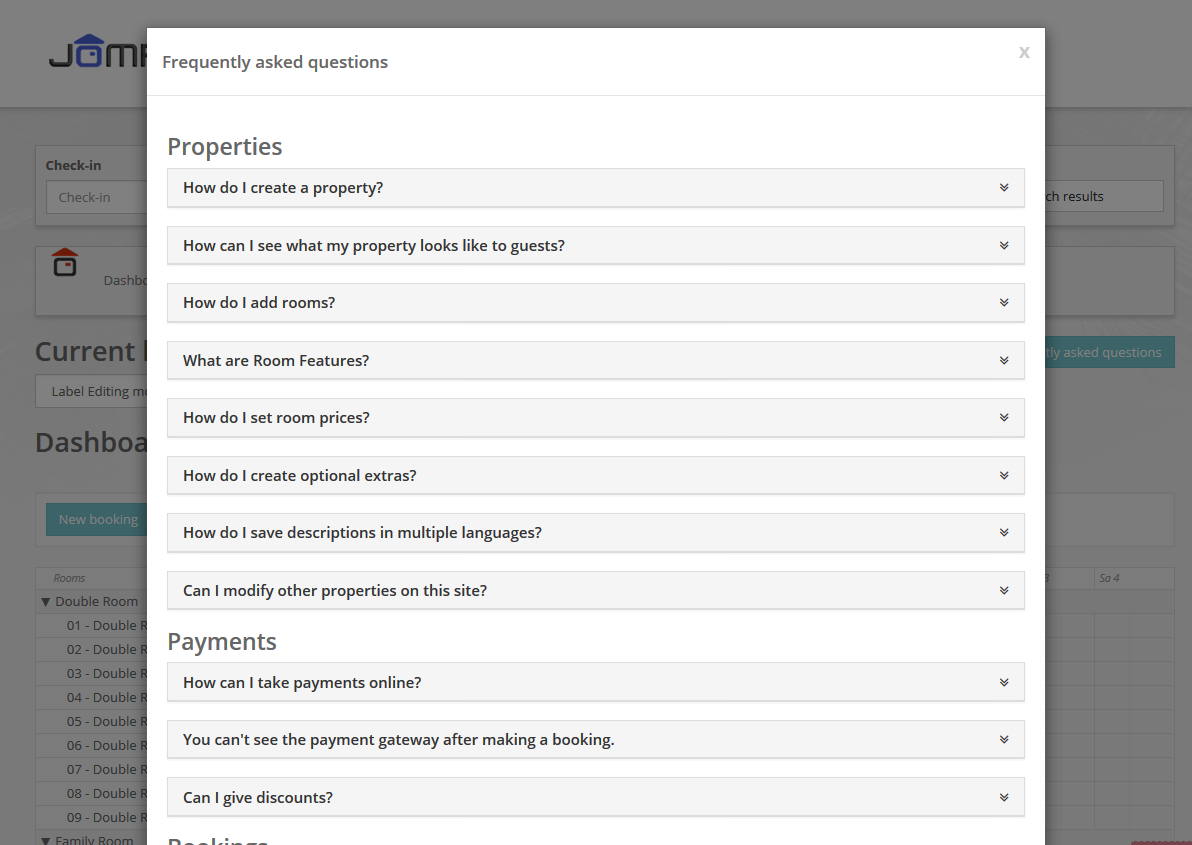
Jomres includes popups in the administrator and property manager pages that provide information and guidance that can help site administrators and property managers to do their jobs.
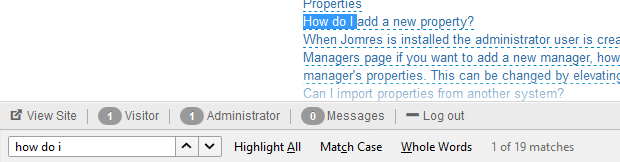
If you want to remove the output completely from the property manager area, edit top.html and remove the code {_JOMRES_FAQ}
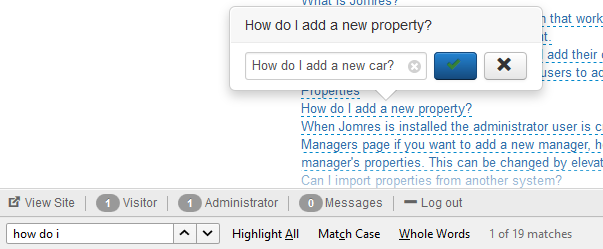
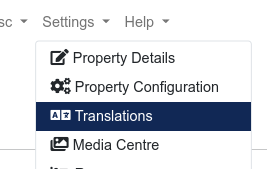
To change the contents of the FAQ questions and answers, the best way is to use the administrator area feature "Translate language file strings".
Find the language string you want to modify by using your browser's search feature
Then click on that string to bring up a popup. You can then edit the string directly here and the change will be reflected in the FAQ.
If you want to add or remove items from the FAQs you will need to edit j07060faq_manager_questions.class.php ( or for site admins, edit j07070faq_admin_questions.class.php ).
The script should be simple enough to understand. Let's take a look at the first question :
$kb->manager_faq['_JOMRES_FAQ_MANAGER_CATEGORY_PROPERTY'][] = array( |
The first part _JOMRES_FAQ_MANAGER_CATEGORY_PROPERTY defines which category the Question and Answer set will be in. In this case, it's "Properties".
The second and third parts, define the question and answer.
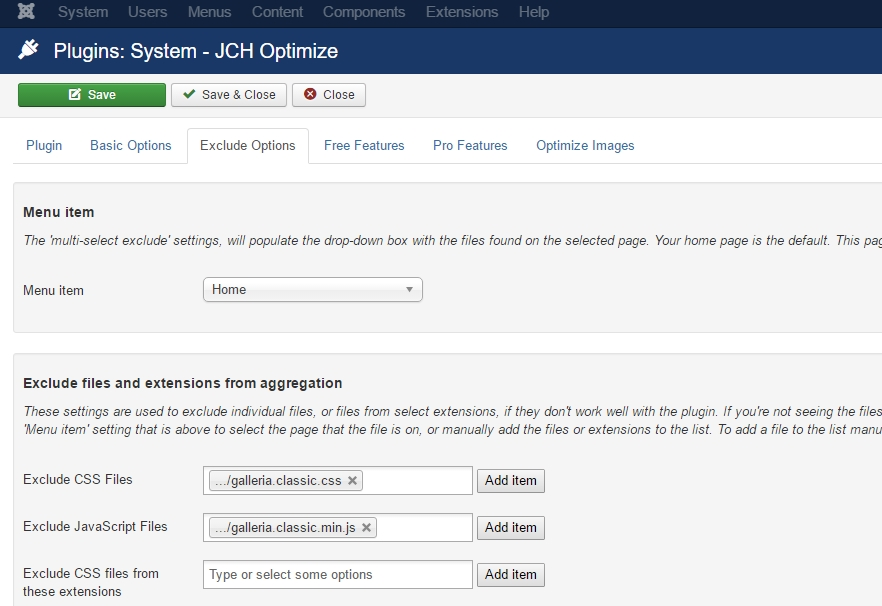
JCH Optimize is a Joomla extension that's proving popular for caching things like javascript files.
To use Jomres with JCH Optimize, you will need to ensure that JCH doesn't try to cache the Jomres slideshow scripts, so you will need to make your settings look like this :
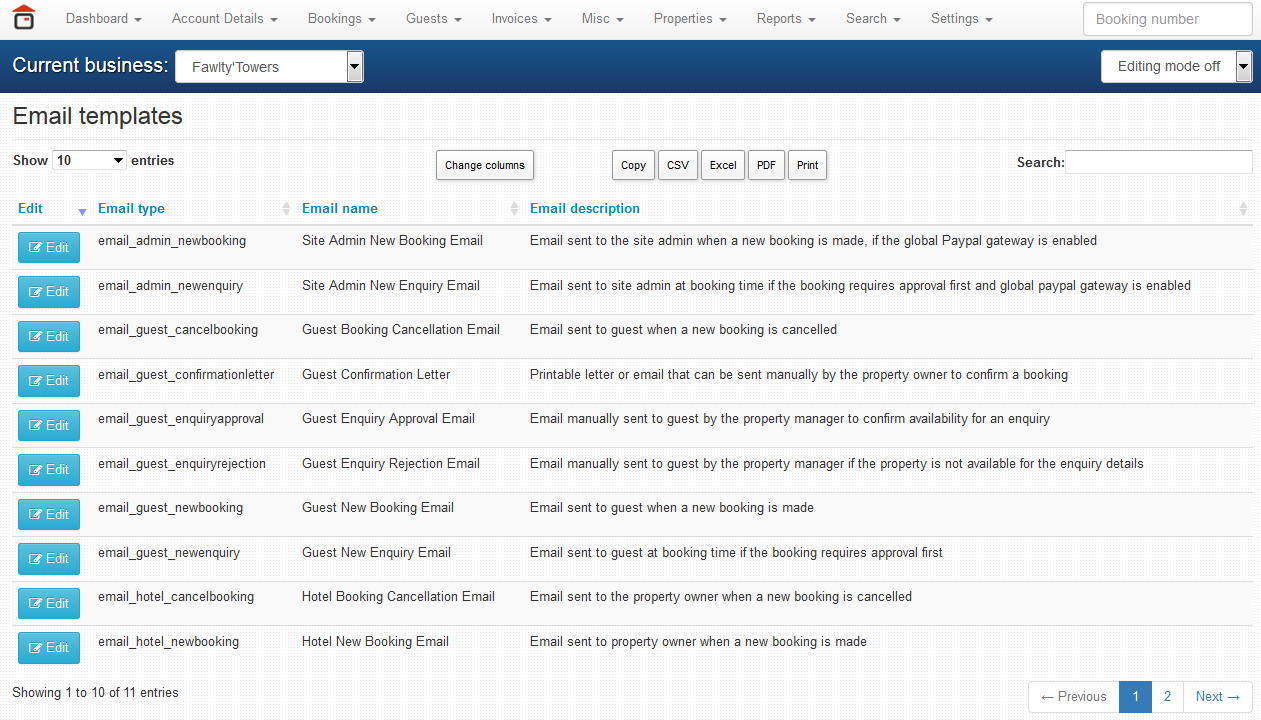
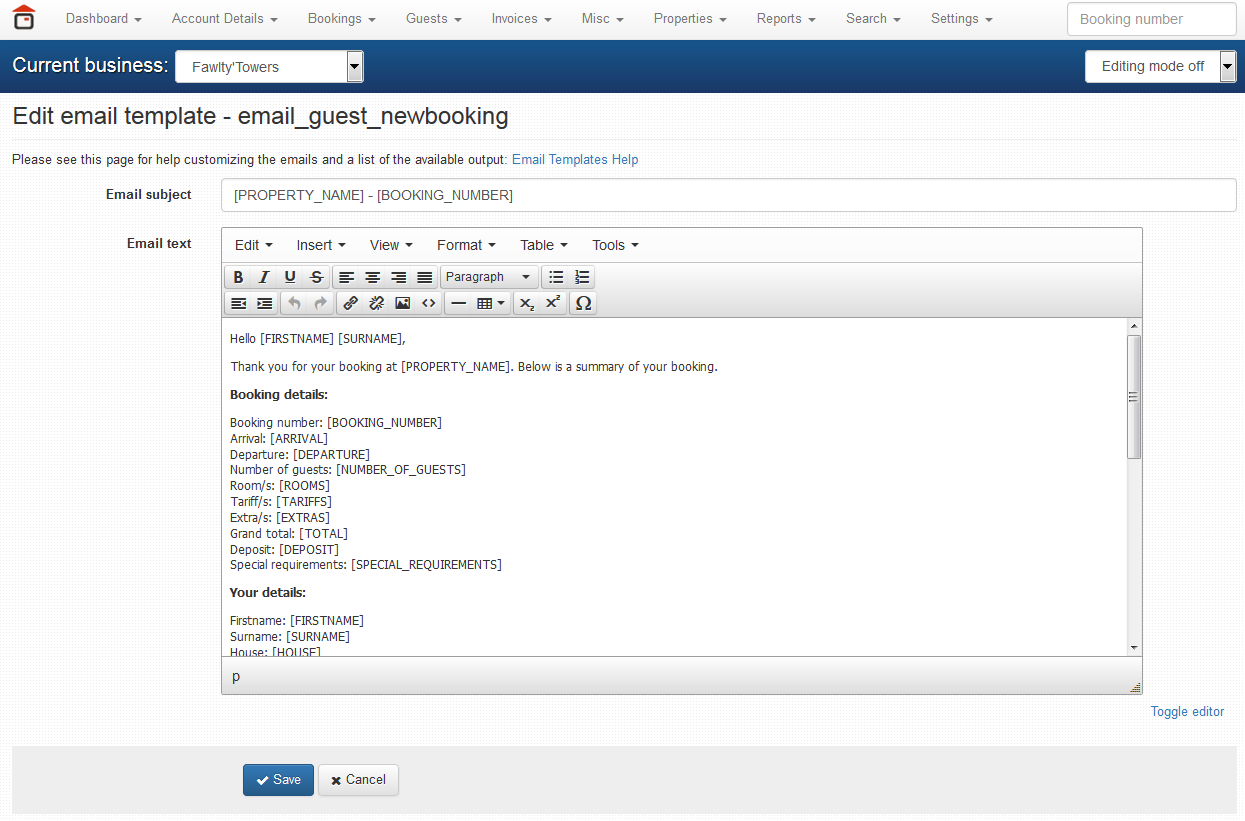
The Email Templates feature allows Property Managers to individually tailor email templates to suit their own circumstances. From the Email Templates screen you will see a number of templates that you can modify.
When you click on the Edit button you can modify that specific template. Customising emails Emails in Jomres can be edited just like articles or property descriptions, assuming that the html editor is enabled in the site configuration->misc tab.
To allow more html tags to be used when editing the emails, you have to add the tags in the “Allowed tags” field in site configuration->input filtering tab Available output*. Email output is replaced automatically with the booking data when sending the email. So everything between [ ] is output that will be replaced. It should always be between [ ] and with CAPS, for example [ARRIVAL] will be replaced when sending the email with the arrival date of this booking.
Contract details output
[ARRIVAL] = arrival date
[DEPARTURE] = departure date
[BOOKING_NUMBER] = booking number
[TOTAL] = booking grand total
[DEPOSIT] = deposit required
[BALANCE] = difference between grand total and deposit required
[SPECIAL_REQUIREMENTS] = special requirements filled in by guest when making the booking
[ROOMS] = selected rooms
[TARIFFS] = tariffs used on this booking
[EXTRAS] = optional extras selected by guest
[LINK_TO_PROPERTY] = link to property details
[NUMBER_OF_GUESTS] = number of each guest type
[BOOKING_CREATION_DATE] = date when the booking was made
Guest details
[FIRSTNAME]
[SURNAME]
[HOUSE]
[STREET]
[TOWN]
[REGION]
[COUNTRY]
[POSTCODE]
[LANDLINE]
[MOBILE]
[EMAIL]
[CUSTOM_FIELDS]
Property details output
[PROPERTY_NAME] = property name where the booking has been made
[PROPERTY_STREET] = property street
[PROPERTY_TOWN] = property town
[PROPERTY_REGION] = property region
[PROPERTY_COUNTRY] = property country
[PROPERTY_POSTCODE] = property postcode
[PROPERTY_TEL] = property phone number saved in property details
[PROPERTY_FAX] = property fax saved in property details
[PROPERTY_EMAIL] = property email
Other output
[PAYMENT_LINK] = link that can be used by a guest to pay later for an approved booking.
[POLICIES_AND_DISCLAIMERS] = property policies and disclaimers saved in property details
[INVOICE] = booking invoice printout (not the full invoice)
[QR_OFFICE] = qr code image for office use (at reception)
[QR_DIRECTIONS] = qr code that can be used by guests to get driving directions to property
*some output may not be applicable to all emails.
Email templates are quite special. They are designed to allow property managers to customise the emails that are sent to guests, so the manager’s customisations are saved in the xxx_jomres_custom_text table. This is the same table that their language customisations are saved in when they use the frontend translations feature.
This means that they can have different emails for different languages, and different properties can have different email layouts.
“How does that help me to have custom global email templates” you ask?
Each customised and translated email template is property specific, so when a record is saved, it’s saved against it’s property uid, in this screenshot it’s property 5, for emails that are sent in the English language.
Translations that are saved in the xxx_jomres_custom_text table are either specific to individual properties or, if the property uid is 0, then it’s a global string. If you use the administrator > Jomres > Translations > Label editing feature you may see some constants* that you have already saved, in this table.
A neat little trick in Jomres is you can make email customisations global. Log into a property in the frontend as a property manager, and make a note of the property uid (unique id). Edit and save the email template (remember to switch your active language in the CMS if you are saving different email templates for different languages). Once you’ve done that, using PHPmyadmin or whatever tool you prefer to use, you can then search the xxx_jomres_custom_text table for constants that start _EMAIL_TEXT, find the one that’s associated with the property uid you noted earlier, and change the property uid in the table record to 0 (zero).
Once you have done that then you’ve now created a global email template. Property managers can still have their own custom email templates if they want, too.
Because this change is saved in the database, it’s update safe.
* They’re not really constants. Back in the day originally labels were PHP constants, but they’re not any more. Nevertheless, the table column name still says “constant”
This section contains information likely to be of use to developers/programmers.
In this section I'd like to talk about the get_property_module_data function.
As with most things in Jomres, this function started out with humble beginnings, but it has evolved to play a crucial role in how Jomres works.
As of Jomres 10, it is used by many different plugins to produce output on pages. From the Extended Maps plugin, to the Property Grid plugin, to others, it's used extensively to display an individual property's details within a template.
Take a look at the fuction's contents on github https://github.com/WoollyinWalesIT/jomres/blob/master/libraries/jomres/functions/get_property_module_data.php
It's called thus :
$module = get_property_module_data( array(1) ); |
When called, the function receives an array of property uids (mandatory), and optionally a path to a template file, and a template file name. If these options aren't used then Jomres will use basic_module_output.html ( for example here ) to produce the layout. It returns both the rendered template file and also the data that was used to construct that output, in an array indexed on the property uid.
The default basic_module_output.html template file's output is relatively simplistic. This is purely for aesthetic reasons but a considerable amount of information is available in the template file, a variable dump of which you will find at the end of this section. Any of that information can be used in a template file that this function calls, so if you wanted to output the town in the template you would just put {PROPERTY_TOWN} and voila! you have your output. (the capitalisation is important).
The Extended Maps plugin uses its own template files to render this output. The Extended Maps google maps info window doesn't support the use of modals.
Sure!
< Jomres 10.7.0
This function is kept in its own file get_property_module_data.php which in turn is included in the system by the j00001functioncall_get_property_module_data.class.php script. This means that you can copy the file to a new location (e.g. /jomres/remote_plugins/custom_code), copy the j00001 script to the same (or another) location and when you edit the j00001 script to point to the new function file's location you can then safely modify this function to suit your own needs.
>= Jomres 10.7.0
If you don’t already have a custom functions script, first create a file called custom_functions.php in the /override_directory/custom_code directory. Next copy the code contents of /jomres/libraries/jomres/functions/get_property_module_data.php into that file.
Voila! You can now customise the function and the changes will not be overwritten when you update Jomres.
Data dump of values available to the called template file :
array(73) { |
Minicomponents are scripts in Jomres which are designed to be discovered and used by Jomres to add, provide, or override functionality in the system. In simpler terms, they're discrete sections of software that perform a certain function. They are similar to hooks in Wordpress and Events in Joomla such as onContentPrepare. I originally came up with the idea of using trigger numbers back in the summer of 2005. Since then several times I have considered replacing the numbers with more descriptive event names but the number system is well understood and well documented so it's not really necessary to refactor them.
The most complete, up-to-date list of these trigger numbers and what they do can be found in the /core-minicomponents directory on Github. Scroll to the bottom of that page.
Jomres comes with a core set of minicomponents, which are installed in the /jomres/core-minicomponents/ directory. If you are looking to modify any core minicomponent, I would discourage you from editing them in-situ. Instead, you should copy any file you want to edit to the /override_directory/ directory, and then a sub-directory called /custom_code/ and make changes to the file there.
The term Minicomponents is derived from Jomres' history. In the past, when I devised how to add functionality on the fly users would install this additional functionality via the Joomla component installer, hence the term minicomponents.
Nowadays a minicomponent is a file whose naming convention follows the style jNNNNNXXXXX.class.php (for example j00006sanity_checks.class.php), and is usually installed via the Jomres Plugin Manager, but it's also possible for you to create the file in the directory and use the Rebuild Registry feature to tell Jomres that it exists.
The registry in Jomres (stored in /jomres/temp/registry.php) is a record of all files that Jomres can run as discrete scripts.
Originally (in V2 of Jomres) these files would be automatically discovered by Jomres each time it ran, however as time went by we realised that as a system's library of minicomponents grew, this discovery process could potentially slow a system down so I broke the minicomponent's handling down further to the minicomponent registry, and the mcHandler class.
The registry is basically the record of where all the runnable files exist, whilst the mcHandler actually calls these scripts to be run. As a developer you should never need to manually edit this file. If you want a new minicomponent to be recognised and used by the system you should use the Rebuild Registry button in the administrator area of Jomres. In effect, all this button does is deletes the registry.php and registry_classes.php files from the /jomres/temp/ directory and forces Jomres to rediscover all runnable minicomponents. You only need to use this button once each time you copy a core minicomponent to a subdirectory in the /override_directory folder, or add a new one. You don't need to run it each time you edit these files. The registry is simply a record of these file's locations, not their contents.
The registry is rebuilt occasionally.
When the registry is rebuilt, Jomres scans certain directories in a specific order
As it scans each directory for the requested file name pattern, each found file is added to the registry. If a filename is found that’s the same as one found before, the new file replaces the original. So, for example if it finds a file called j01060slideshow.class.php in the /html/com_jomres/ directory then that will be used instead of the file j01060slideshow.class.php in the /jomres/core-minicomponents/ directory.
As a result, it’s possible to have several scripts with the same name (e.g. j01060slideshow.class.php) in different places in the directory structure. If you’re customising scripts then, because you now know that the inclusion order is core-minicomponents -> core-plugins -> remote_plugins -> the theme/template’s /html/com_jomres directory you know which script is likely being used. If, for example, a script exists in both core-minicomponents and the /override_directory/custom_code directory, then the one in custom_code will be used.
Here we'll discuss some techniques we use when developing plugins for Jomres.
Different minicomponents are called at different times, depending on their trigger number. We'll refer to these types of scripts by their trigger number, and occasionally offer examples where you can see them in use.
Calling this function will give you the absolute path to whichever script is being run. If you're using template files to generate layout (and you should be), however you'll need to do something like
$tmpl->setRoot( $ePointFilepath.'templates'.JRDS.find_plugin_template_directory() ); |
to tell the $tmpl object where your custom template file is located. As a plugin developer you should be distributing plugins that are compatible with Jomres' own templates (Bootstrap 2 and Bootstrap 3 & Bootstrap 5) in respective directories templatepath/bootstrap and templatepath/bootstrap3 templatepath/bootstrap5.
Hint : If you intend to call other minicomponents from this minicomponent, call get_showtime('ePointFilepath') and put the results in a variable before calling another minicomponent. The instant the next minicomponent is called, get_showtime('ePointFilepath') is reset to the next minicomponent's absolute path.
This is a little similar to ePointFilepath, in that it points to the directory this script's running in, relatively from the base of your website. Let's say that your website's at http://www.domain.com, then eLiveSite will point to the url http://www.domain.com/jomres/remote_plugins/xxxxxx/
In the flipwall plugin you'll see that we use this variable to include the flipwall's jquery.flip.js file in the host CMS's header, like so :
jomres_cmsspecific_addheaddata("javascript",get_showtime('eLiveSite').'javascript/',"jquery.flip.js",false); |
> Jomres 10.7
In 10.7 there’s a new function called jomres_get_relative_path_to_file()
This was written to allow simple overriding of Core css and javascript files. Sometimes you know the absolute location of a file, but not its relative path. This function will return the relative path to a known file, typically so that you can add it to the document’s head, e.g. by using the jomres_cmsspecific_addheaddata function.
These are generally your setup scripts, where you include functions files, import classes and include language files.
$ePointFilepath = get_showtime('ePointFilepath'); require_once($ePointFilepath.'language'.JRDS.get_showtime('lang').'.php'); } else { |
Here we're looking to find the current language's language file for this plugin. If it doesn't exist, we'll fall back to the english language file for this plugin (if it exists).
Ok, that's mundane enough, let's try something a little bit more fun.
Let's say that our plugin introduces functionality so unique that we want to disable certain things inJomres, based on certain conditions. Let's see how Jintour's j00005get_jintour_property_data.class.php file does things.
In a Jintour based property, we can't show the normal dashboard, because Jintour bookings aren't the same as normal bookings, so to switch off the standard dashboard script, we do the following :
unset($MiniComponents->registeredClasses['00013dashboard']); |
How cool is that? Just like that, for Jintour based properties, with one line we've switched off (among other things) the dashboard calendar.
Something else we can do, and we typically do this in j00005 scripts, is redirect calls from one of the core template files, to another template file. Again, Jintour's j00005 script gives us an example of how this is done :
if ($_REQUEST['task'] == "editProperty") { |
Jintour based properties have less information to show in the property details, so in the event that the currently viewed property is a jintour property (see that script to see how we determine that) we tell Jomres to use the edit_property.html file in our /templates directory, not the one in /jomres/templates/jomres/backend.
Jomres makes use of Singletons for a variety of reasons. The main one being that we can ensure that data is called just once and it is retained throughout a run. Jomres can be triggered in a number of ways, e.g. through the component itself, or via modules and plugins (mambots) consecutively. This would mean some database intensive queries could be called several times, so we sidestep this by using singletons to retain the information called and then reuse it later.
There's a special singleton in Jomres called "Showtime" ( named after my favourite server on Novalogic's Delta Force 2, yes I know I'm a geek ) which can be used to store data throughout a run. Let's say you've generated some data in a 00005 script that you know you'll use later in another script. You can use the Showtime variables to retain the information temporarily, like so :
set_showtime('my_data', array ( 1, 2, 3 ) ); |
and then use it later by calling
$my_data = get_showtime('my_data'); |
Just remember that the data isn't persistent. Once the run completes the data is lost, so if you want to maintain that information you'll need to store it somewhere more permanent.
As a developer working on your clients sites it's quite possible that you will want to use some of the functionality in Jomres, but in your own scripts.
The best way to do that is by using the "Alt Init" plugin.
if (!defined('_JOMRES_INITCHECK')) |
Once you have done that you can then use Jomres framework code snippets in your own scripts. Naturally you will probably need to change the paths from what’s shown in this example to something that suits your environment.
In this article I will show you how to create a simple Jomres plugin called Hello World.
It assumes that you're already familiar with working with PHP scripts, the purpose here is to demonstrate how you can create a simple plugin with code that can be used on both Joomla and Wordpress installations of Jomres. It also assumes that you have a working installation of Jomres up and running.
Once it has been created you will be able to enter the "hello_world_simple" task in the address bar of your browser, like this :
And you will see simple output like this in the page
There are other ways to display the output, but in this example we'll stick with this simple example.
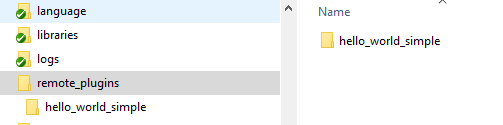
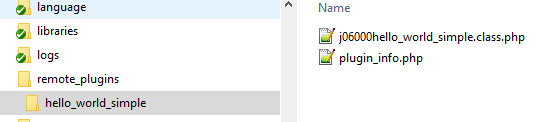
Ok, let's get started. First you need to navigate to your /jomres/remote_plugins directory and create a new directory called hello_world_simple
Once that has been done, you need to create your plugin information file. The file should be called plugin_info.php and it'll contain the following data :
<?php |
As you can see the class name and the name in the $this->data array "name" index must match the plugin name and the parent directory.
Save that file. Next you need to create a new file called j06000hello_world_simple.class.php in the same directory.
The basic structure of a plugin file is that it starts with JNNNNNXXXXX.class.php
For a complete breakdown of Jomres trigger numbers, see the README.md on Github (you'll need to scroll to the bottom),
In this file you will need to enter the following lines
<?php |
This is a very simplistic example of a plugin. If you were to copy it you would only need to change the name of the class (this is what defines the name of the "task" that you will call) and the actual code performing the work, in this case just
echo "<h1>Hello World!</h1>"; |
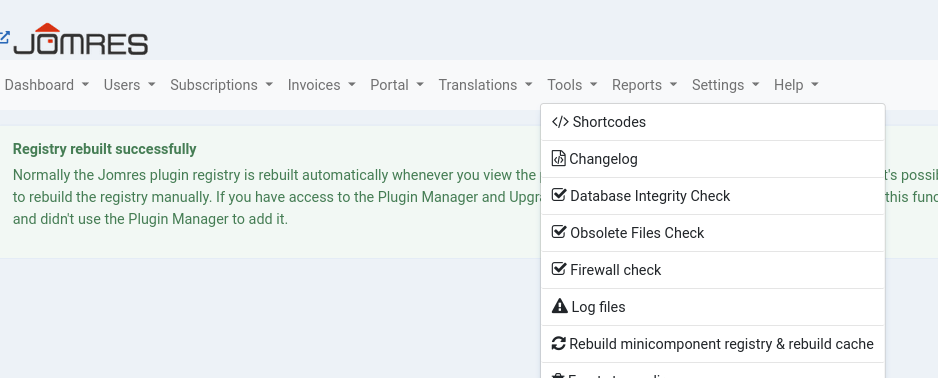
Now, before Jomres can use this script it needs to be added to the internal Jomres registry. Once you have saved the file you need to rebuild the registry, this will tell Jomres that the script files exist.
You only need to rebuild the registry once, when you create the file ( including after copying a core file to a directory in /remote_plugins/xxxxx this tells Jomres to use this one instead of the original.)
Ok, that's it, all done! You can now call the task directly through the browser's address bar, as shown at the top of this page, by entering something like http://localhost/test/index.php?option=com_jomres&task=hello_world_simple in the browser.
There are other ways it can be called too, for example through shortcodes, or Jomres ASAModule.
Jomres, as a plugin for both Joomla and Wordpress, does not stand in isolation. Instead it is part of a larger set of moving parts that make up your Content Management System.
It's not possible (for me) to lock down an installation of Jomres so that malicious or faulty code in other plugins cannot access the data in Jomres tables. I can secure the system as much as possible, however vulnerabilities in other areas of the CMS or its plugins are outside of my control and there's always a risk that guest or manager data might be exposed to unauthorised users.
Article 33 of the GDPR outlines personal data breach reporting requirements, specifically addressing when organisations must report breaches and within what timescales. Failure to report breaches, and address those breaches after the fact, can result in heavy fines. As the developer of GPL software that offers absolutely no warranties whatsoever I would not be affected, however my clients would be and I consider it both a professional and moral duty to ensure that the risks to them are minimised as much as possible.
While planning how Jomres would be compliant with the GDPR I realised that this was the right time to introduce the user encryption that I had wanted for a long time to implement. The goal was that, even if guest and manager PII (personally identifiable information) should somehow be exposed, this exposure should do no harm because this information would be encrypted and of no use to attackers.
As a result, in the spring of 2018 Jomres was modified so that all existing guest data was encrypted in new installations and any sites that were updated with the newest version. This brings its own set of problems in that coders find it more difficult to access guest data when generating their own reporting tools. In this section I'll describe how those coders should use the Jomres framework to extract the information that they want.
This particular file deserves special mention, because without it you will find it impossible to decrypt guest and manager data.
The file encryption_key.class.php was introduced in the middle of 2018.
Its purpose is to allow the system to encrypt and decrypt Personally Identifiable Information (PII), I.E. guest and property manager's sensitive information.
If the file does not exist, on installation it is immediately created and put into the Jomres root directory, e.g. public_html/jomres. You can move this file, indeed it is recommended that you move it outside of the web server's root altogether and modify /jomres/configuration.php and set the $jrConfig['secret_key_location'] value to the absolute path of its location.
Because this file is vital to decrypting your guest and manager data, you must not modify it and you must keep it safe at all times. Without it it's not possible to decrypt said data.
To decrypt PII for your own use, you cannot simply access the Jomres tables that contain this data. Instead you need to include the Jomres framework and use its built-in functionality to decode an individual's data.
Given that the majority of Jomres users are hosted on Joomla, this example will refer to a "module", however Wordpress developers will be able to use similar concepts when building widgets or other applications for Wordpress. If you want to see one such example, open up the "Jomres Search" widget included in the Jomres Wordpress Quickstarts. The principles are largely the same.
Including the framework is simple enough, however I'll break down the steps, for clarity. I will assume that you already have sufficient coding skills to build a basic module or application for Joomla or Wordpress.
if (!defined('_JOMRES_INITCHECK')) |
If not already defined, we will define _JOMRES_INITCHECK otherwise Jomres scripts will not run.
Next we will check for the existence of a definition called JOMRES_ROOT_DIRECTORY. Before getting permission to be listed on the Wordpress plugin directory it was their insistence that whilst Jomres might be able to run from its own unique path, that path must be changeable by the site administrator. Although I thought it was an unnecessary complication, those were the rules and I have to abide by them.
Finally, we will include a Jomres plugin called alt_init.php. This plugin is able to include the entire Jomres framework without you needing to do any more work.
Before we start, you will find that there are two guest tables : xxx_jomres_guests and xxx_jomres_guest_profile. Why, you ask?
The reason is primarily historic. Jomres was first conceived in 2005, and since then millions of lines of code have been added and removed from it. The jomres_guests table was the first one added, and the guest_profile table was added some years later as a way for guests to change their own data and have that change trickle down to hotels that they had previously booked at. At the same time, I didn't want changes made by one hotel to be reflected back to the guest profile table and thence to other hotels, perhaps the hotel has rather unprofessionally left some comments that should stay with just that hotel?
If you want to access guest data, if the user you are accessing is a registered user in the system, you can query them by their cms id and look for their details in the guest profile table. See Method 2.
If the guest might not be a registered user you must first know the id of the property that they are a guest of, and of course their id. Once known you can use the jrportal_guests class to pull their data out. This class will handle the decryption for you.
jr_import( 'jrportal_guests' ); |
In the next scenario, the user is a registered user, perhaps they're logged in and you want to pull their information for display into a module or widget.
In this module, we will assume that you already know the guest's cms id. If you don't, you can get it by doing
$user = JFactory::getUser(); |
in Joomla, or
$user = wp_get_current_user(); |
in Wordpress.
We will include the encryption class from Jomres, and create a new instance.
jr_import('jomres_encryption'); |
Now we are ready to pull the data from the guest profile table.
$query = 'SELECT enc_firstname,enc_surname,enc_house,enc_street,enc_town,enc_county,enc_country,enc_postcode,enc_tel_landline,enc_tel_mobile,enc_email FROM #__jomres_guest_profile WHERE cms_user_id = '.(int) $id.' LIMIT 1'; |
This pulls the encrypted data from the database. Next we need to decrypt it.
if (!empty($guestData)) { |
You now have the guest's first name as stored in the database for use in your own code.
Now that you know how to decrypt guest data, encryption you will see is the opposite.
To save a guest as a guest of a given property :
jr_import( 'jrportal_guests' ); |
Guest profiles table
Unfortunately I don't yet have a class for guest profiles, so have a look in j06005save_my_account.class.php to see how guest profile records are saved.
In this section I am going to discuss how you as a developer can use the code in minicomponents to help you to call discreet Jomres scripts.
This information is helpful to you if you want to include code from Jomres into other scripts, or just if you're building your own minicomponent.
The section actually addresses two distinct scenarios, the first is how to access a minicomponent you've written yourself, and the second is how to include rendered snippets from a minicomponent into your own code. As a developer you are probably more interested in the second part, but I recommend you read the first part so that you can understand how things are interconnected.
Let's dive right in.
These examples are taken from the Show Property Reviews script on Github
This is what you will see at the top of the script.
$this->shortcode_data = array( |
Before I continue, I should point out that one argument that's always missing from this list of options is "output_now". Most minicomponents that output stuff to the page have it, so in general you can assume that it's available but if not you should check out the minicomponent script itself to be sure. Note, this is only relevant if you are calling one script from another. If you are calling the script via the url (more on that in a moment) you can assume that the output will be immediate.
I should also point out that the shortcode_data at the top of the scripts isn't used by the script itself in any way. It's there solely to allow the Admin > Jomres > Tools > Shortcodes page to generate its output. It is, however, useful to you as a developer. You don't need to refer to each script to see this information.
The Shortcodes page in the administrator area will use this information to build a shortcode suggestion like this : [jomres task="show_property_reviews" params="&property_uid=1&reviews_limit=3"]
If you are developing your own minicomponent and you want to test it to see how it looks, you could go through the process of adding scripts to menus, but often that's not needed. Fortunately, you don't need to do that.
You can call 06XXXX minicomponents directly from the url.
Firstly, please remember that if you've built a new script that looks something like j06000xxxxx.class.php (or 06100/06200/06500) then don't forget to rebuild the registry once you have created it. That tells Jomres that the script exists. Once you've done that you can do the next step.
Let's assume that the site I'm working on generates urls that look like http://localhost/Joomla_4/index.php?option=com_jomres&view=default&Itemid=103 or http://localhost/wordpress-5.9.3/index.php/bookings/?option=com_jomres& (Joomla and Wordpress respectively) when I'm on a Jomres page. I'll refer to these urls as {URL} from now on.
If I want to call the Show Property Reviews page directly from the address bar of the browser, I can by putting together the information from the shortcode to create a url that looks like
{URL}&task=show_property_reviews&property_uid=1&reviews_limit=3
If I put that into the address bar of the browser, then the property reviews page will show.
You might be thinking "So what? I can get that from the page itself." and you'd be right. What I'm doing here is demonstrating to you how to use information in ways that might not be immediately obvious to you.
Moving on, let's assume that you are a developer who wants to include Jomres output in his or her own page.This saves you bucketloads of time because you don't want to reinvent the wheel. I've already done that for you, all you need to do is work your own magic.
So, instead of telling you to dig into the code of such a large system as Jomres to see how to do it, I'll use the shortcode as a shortcut to help you out.
Remember, the shortcode for property reviews looks like this : [jomres task="show_property_reviews" params="&property_uid=1&reviews_limit=3"]
Now, as the developer you will first need to pull in the Jomres framework so that you can use what's on offer. That is described in the Using the Jomres Framework section. Once you have access to the Jomres framework you can then call a script like this :
$MiniComponents = jomres_singleton_abstract::getInstance('mcHandler'); |
Notice how the argument output_now is set to false? This tells the script to return the rendered template instead of showing it.
Now that you have this wonderful nugget of information, you have learned that you can do the same with other shortcodes.
Take a look at the Property features shortcode
[jomres task="show_property_features" params="&property_uid=1"] |
To include that code in your own script you would do this :
$features = $MiniComponents->specificEvent('06000', 'show_property_features', array('output_now' => false, 'property_uid' => $property_uid)); |
Another example :
[jomres task="show_property_slideshow" params="&property_uid=1"] |
$slideshow = $MiniComponents->specificEvent('06000', 'show_property_slideshow', array('output_now' => false, 'property_uid' => $property_uid)); |
So, here I have shown you ways that you can use the Jomres framework in ways that you may not have been previously aware of. Hope it helps.
Here I will give you a brief overview of how to install and create pseudocron jobs for Jomres.
Jomres supports a pseudo cron system, IE a system that works a bit like timed jobs in linux (cron). Cron jobs are called on a timed basis depending on how the cron job was installed (this cannot be changed at a later time, except by manually editing a table).
As a plugin developer, you will want to tell Jomres that there are scripts you want to call on a timed basis. You do this in the plugin_install.php of your plugin. An example can be seen on the Creating plugins page.
jr_import('jomres_cron'); |
This functionality "registers" the cron job with the pseudocron functionality, and the intervals are as follows.
"M": // Every minute
"QH": // Every quarter hour
"H": // Every hour
"D": // Every day
"W": // Every week
The cron job file itself
A cron job file is just like any other 06000 task, ie it can be called by anybody, assuming that the menu linking to Jomres allows unregistered users to view it.
That's it. It's very simple. Create a 06000 task that "does stuff", then use ''addJob'' in ''plugin_install.php'' to tell Jomres to call it from time to time.
Jomres supports having template overrides in templates/themes, however sometimes you need to take things further.
The majority of our users are developers who are setting up sites for their clients. For them, the standard template override feature is sufficient, they make the changes the client requests then move on.
Some of our users, however, are long-time Jomres users (thank you!) and for these users, if they update a template like Leohtian, their existing overrides can be overwritten when the template is updated. This is where Template Override Packages (TOP) come in.
These are also useful if you want to distribute a Jomres template set, but not a WordPress theme/Joomla template. A Jomres template package should work in both WordPress and Joomla without any changes.
A typical TOP plugin will have a plugin_info.php file, a minicomponent with the trigger number 00001 and a number of template files.
Let's take a look at the Template Package Booking Form Layouts plugin together, this will help you to understand.
This plugin info file has a class called plugin_info_template_package_booking_form_layouts, and if you open it you will see some basic plugin information. If you intend to create your own template packs, then you will need a plugin_info.php file. You must ensure that the name of the class is changed to reflect your own template pack's name.
The $this->data name array key should also reflect the name of the pack in the same way that the class does. Aside from those two fields, if you do not intend to distribute this plugin then you don't really need to do much with the rest of the data in the plugin_info.php file.
The next file in our example plugin is called j00001template_package_booking_form_layouts.class.php
The 00001 number ensures that this script is triggered as soon as Jomres starts.
The important lines in this file are :
$this_plugin = "template_package_property_details"; |
Let's break down what it does.
$this_plugin = "template_package_property_details"; |
This line sets the plugin's name. It can be anything you want but it needs to be valid PHP as it is used as the template package array index, so something like "my_first_template_pack" would work fine, however "my first template pack" would not.
$ePointFilepath=get_showtime('ePointFilepath'); |
The absolute path relative to the server's root, of the location of this script.
$template_path = str_replace ( JOMRESPATH_BASE , "" , $ePointFilepath ); |
This is then changed to determine the path to these template files, relative to Jomres' root. If you are making your own package then it's safe to just copy these two lines.
$template_packages = get_showtime('template_packages'); |
"showtime" in Jomres is a singleton object that is used to make information available to various scripts on Jomres. Here we are pulling the variable "template_packages" from the showtime object. If it's not yet set then we will set it to be an empty array. Again, you can just copy this into your own 00001 script.
$template_packages[$this_plugin][] = array ( |
In the example plugin there are actually three templates that are overridden, but I will only show the main override here.
Here's where we define the template we intend to override, in this case dobooking.html which is the template file that is used by hotels/B&Bs etc. We give this a title and a description. As of 9.9.3 the description and any screenshot aren't yet used, this is functionality we will provide later if the feature proves popular.
set_showtime('template_packages' , $template_packages ); |
Finally we save this new information to the showtime object. Once installed this information is then available to the Template Override Packages page.
Documenting a feature is all very well, but practical examples where you can see a use for a feature will help even more, so let's have a look at a common requirement.
NB: This particular tutorial was written for the Leohtian template. That template is no longer being used; however the basic functionality is still valid.
Many users have different requirements for what is displayed on a Jomres page. I have long taken the view that it's easier for me to collate as much information as is relative to a template, and add it. That way, it's easier for users to remove the information they don't want, instead of having to ask me how to add more.
For example, we will show you the Random Accommodation plugin which you often see on the front page of Jomres Leohtian sites
On hover you can see a Read More button. Clicking on that opens up a modal like this
Let's say, for example, that we don't want to show the address details in this template. We could modify this file, but if the Leohtian template is updated any changes we make to this file will be lost, therefore we are going to make a TOP plugin. This plugin can then be zipped up and uploaded to multiple Jomres sites, or even sold on to other Jomres users if you think they'll like the pack.
First we will make a new directory in the remote plugins, like this :
Inside that directory I will create a new plugin_info.php file, and in that I will put this :
// ################################################################ |
Next I will create a 00001 script which tells Jomres that files are available. I'll call it j00001my_first_template_package.class.php and it will contain :
// ################################################################ |
Once I have created that file, I will need to rebuild the registry to make sure that Jomres includes this script every time it runs.
Now I can copy property_header.html from the \templates\jr_leotian\html\com_jomres directory into this one. When I've chosen this template in the Template Override Manager then this version of that file will be used instead of the one in \templates\jr_leotian\html\com_jomres. When that's done I can customise this file as much as I want to remove the address details, this file will not be overwritten when Leohtian is updated.
If I want to re-use this package on other installations, all I need to do is zip up the contents of the directory.
With these files in a zip file, you can use the Jomres Plugin Manager Third Party Plugins page to upload these changes to other sites.
In the plugin info file you should also add some information if you plan to distribute the plugin.
'third_party_plugin_latest_available_version' => "", |
These two lines will tell Jomres where it can get updated version information about the plugin, and offers a link to a url where the update can be downloaded from. This could be a direct link, or to a shop page.
'third_party_plugin_latest_available_version' => "http://localhost/versions/my_first_template_package.json", |
Your template versions file should be a json file : my_first_template_package.json which contains the following information.
{ |
A webhook in web development is a method of augmenting or altering the behavior of a web page, or web application, with custom callbacks. These callbacks may be maintained, modified, and managed by third-party users and developers who may not necessarily be affiliated with the originating website or application. The term "webhook" was coined by Jeff Lindsay in 2007 from the computer programming term hook.[1]
In practical terms, a Webhook Event (also known as a webhook message) is a php object that contains information about something that’s happened within the system. It could be that a booking was made, a guest created or a room updated. Each of these actions create a webhook event. During a run, several webhook events can be created.
The purpose is to package information in such a way that it can be sent off to remote services which may use that information. Perhaps the remote service could then use a REST API endpoint to retrieve information about a new guest or property, for example.
First, let’s look at a basic Webhook Event
Code often changes so the lines may be wrong, therefore I’ll paste the code in here :
$webhook_notification = new stdClass(); |
At the end of a run, if any Webhook Events exist then the webhook watcher processes them
Plugins can use Webhook Events, for example the Beds24 plugin has a 07310 script, which is triggered by the webhook watcher above. It will look to see if the property is a Beds24 property and if so it will automatically set into motion steps to update Beds24 with the change (if appropriate).
Property managers can use Webhook Events to notify remote sites about a Webhook Event being triggered. To do that they have to create a new Webhook Integration in Frontend > Account Details > Webhooks. On this page they can save usernames and passwords of remote services that they want to send notifications to.
Only Property Managers can use Webhook Integrations. Super Property Managers cannot. This is because Webhook Integrations are associated with Property Manager accounts, not individual properties.
The reason why it's done this way is because webhook notifications are not necessarily done by any specific user, so setting up a tariff might be done by the property manager, whereas making a booking is done by a, potentially anonymous, user. As a result, typically actions are referenced against the property uid and not a property manager.
Webhook Integrations are linked to managers and not properties because it is the manager who has the relationship with the remote service. This allows a manager to create one Webhook Integrations for all of their properties, instead of one for each property.
When an action is performed, the manager for the property is found and any Webhook Event is triggered. Because super property managers do not have a relationship with any specific property, it is more difficult to find a manager for that property when triggering the event. In theory it would be possible to search for all super property manager's webhooks, however that would mean sending one webhook action/event to potentially many super managers and there's no telling what chaos could occur if that happened.
Remote services can take many forms. They can be your own server where you have created scripts that perform certain activities when they have been informed of something happening on your site, or they can be services like Zapier, which offers significant integrations to other tools such as Twitter, Slack, Facebook etc. So you could, for example, update a Slack chatroom when a new booking is added.
Different remote services will have different authentication and data requirements, therefore we provide 3 functional Webhook Integration plugins, plus a MailChimp plugin.
These plugins will never cover all possible requirements that remote services may demand, however they provide enough functionality that you can build upon in case you need to connect to a service that has its own set of rules. You could copy or customise one of these existing webhook plugins to suit your own requirements.
Webhook Event | blackbooking_added Logs when black bookings are added. |
File | j02136saveblackbooking.class.php |
Jomres Plugin | black_bookings |
Data Object Parameters | property_uid contract_uid |
|
|
Webhook Event | blackbooking_added Logs when black bookings are added. |
File | j06001ajax_dashboard_save.class.php |
Jomres Plugin | black_bookings |
Data Object Parameters | property_uid contract_uid |
|
|
Webhook Event | blackbooking_deleted Logs when black bookings are deleted. |
File | j02138deleteblackbooking.class.php |
Jomres Plugin | black_bookings |
Data Object Parameters | property_uid contract_uid |
|
|
Webhook Event | blackbooking_deleted Logs when black bookings are deleted. |
File | j06001delete_multiple_blackbookings.class.php |
Jomres Plugin | black_bookings |
Data Object Parameters | property_uid contract_uid |
|
|
Webhook Event | booking_added Logs when a booking is added. |
File | j03020insertbooking.class.php |
Jomres Plugin | core |
Data Object Parameters | property_uid contract_uid |
|
|
Webhook Event | booking_cancelled Logs when a booking is cancelled. |
File | jomres_generic_booking_cancel.class.php |
Jomres Plugin | core |
Data Object Parameters | property_uid contract_uid |
|
|
Webhook Event | booking_marked_noshow Logs when a booking is marked as No Show. |
File | j06001mark_booking_noshow.class.php |
Jomres Plugin | core |
Data Object Parameters | property_uid contract_uid |
|
|
Webhook Event | booking_modified Logs when a booking is modified. |
File | j03020insertbooking.class.php |
Jomres Plugin | core |
Data Object Parameters | property_uid contract_uid |
|
|
Webhook Event | booking_modified Logs when a booking is modified. |
File | jomres_generic_booking_amend.class.php |
Jomres Plugin | core |
Data Object Parameters | property_uid contract_uid |
|
|
Webhook Event | booking_note_deleted Logs when booking notes are deleted. |
File | j06001deletenote.class.php |
Jomres Plugin | [@webhook_event_plugin] |
Data Object Parameters | contract_uid property_uid note_id |
|
|
Webhook Event | booking_note_saved Logs when booking notes are added/edited. |
File | j06001savenote.class.php |
Jomres Plugin | core |
Data Object Parameters | contract_uid property_uid note_id |
|
|
Webhook Event | booking_note_saved Logs when booking notes are added/edited. |
File | functions.php |
Jomres Plugin | core |
Data Object Parameters | contract_uid property_uid note_id |
|
|
Webhook Event | deposit_saved Logs when deposit is added to a booking. |
File | j02202savedeposit.class.php |
Jomres Plugin | core |
Data Object Parameters | contract_uid property_uid depositref |
|
|
Webhook Event | extra_deleted Logs when optional extras are deleted. |
File | j02148deleteextra.class.php |
Jomres Plugin | optional_extras |
Data Object Parameters | extras_uid |
|
|
Webhook Event | extra_saved Logs when optional extras added/updated. |
File | j02146saveextra.class.php |
Jomres Plugin | optional_extras |
Data Object Parameters | extras_uid |
|
|
Webhook Event | guest_checkedin Logs when guests are checked in. |
File | j06001checkin.class.php |
Jomres Plugin | book_guest_in_out |
Data Object Parameters | contract_uid property_uid |
|
|
Webhook Event | guest_checkedin_undone Logs when guests checked in is undone. |
File | j06001undo_checkin.class.php |
Jomres Plugin | book_guest_in_out |
Data Object Parameters | contract_uid property_uid |
|
|
Webhook Event | guest_checkedout Logs when guests are checked out. |
File | j06001checkout.class.php |
Jomres Plugin | book_guest_in_out |
Data Object Parameters | contract_uid property_uid |
|
|
Webhook Event | guest_checkedout_undone Logs when guests checked out is undone. |
File | j06001undo_checkout.class.php |
Jomres Plugin | book_guest_in_out |
Data Object Parameters | contract_uid property_uid |
|
|
Webhook Event | guest_deleted Logs when a guest is deleted. |
File | j02226deleteguest.class.php |
Jomres Plugin | core |
Data Object Parameters | guest_id property_uid |
|
|
Webhook Event | guest_saved Logs when a guest's details are added/updated. |
File | j02224saveguest.class.php |
Jomres Plugin | core |
Data Object Parameters | guest_id property_uid |
|
|
Webhook Event | guest_type_deleted Logs when guest type deleted. |
File | jrportal_guest_types.class.php |
Jomres Plugin | core |
Data Object Parameters | property_uid guest_type_uid |
|
|
Webhook Event | guest_type_saved Logs when guest types added. |
File | jrportal_guest_types.class.php |
Jomres Plugin | core |
Data Object Parameters | property_uid guest_type_uid |
|
|
Webhook Event | guest_type_saved Logs when guest types updated. |
File | jrportal_guest_types.class.php |
Jomres Plugin | core |
Data Object Parameters | property_uid guest_type_uid |
|
|
Webhook Event | invoice_cancelled Logs when an invoice is marked as cancelled. |
File | jrportal_invoice.class.php |
Jomres Plugin | core |
Data Object Parameters | property_uid invoice_uid |
|
|
Webhook Event | invoice_saved Logs when an invoice is added. |
File | jrportal_invoice.class.php |
Jomres Plugin | core |
Data Object Parameters | property_uid invoice_uid |
|
|
Webhook Event | invoice_saved Logs when an invoice is added. |
File | jrportal_invoice.class.php |
Jomres Plugin | core |
Data Object Parameters | property_uid invoice_uid |
|
|
Webhook Event | invoice_saved Logs when an invoice is added. |
File | jrportal_invoice.class.php |
Jomres Plugin | core |
Data Object Parameters | property_uid invoice_uid |
|
|
Webhook Event | invoice_saved Logs when an invoice is added. |
File | jrportal_invoice.class.php |
Jomres Plugin | core |
Data Object Parameters | property_uid invoice_uid |
|
|
Webhook Event | invoice_saved Logs when an invoice is added. |
File | jrportal_invoice.class.php |
Jomres Plugin | core |
Data Object Parameters | property_uid invoice_uid |
|
|
Webhook Event | invoice_saved Logs when an invoice is added. |
File | jrportal_invoice.class.php |
Jomres Plugin | core |
Data Object Parameters | property_uid invoice_uid |
|
|
Webhook Event | invoice_saved Logs when an invoice is added. |
File | jrportal_invoice.class.php |
Jomres Plugin | core |
Data Object Parameters | property_uid invoice_uid |
|
|
Webhook Event | invoice_saved Logs when an invoice is added. |
File | jrportal_invoice.class.php |
Jomres Plugin | core |
Data Object Parameters | property_uid invoice_uid |
|
|
Webhook Event | invoice_saved Logs when an invoice is added. |
File | jrportal_invoice.class.php |
Jomres Plugin | core |
Data Object Parameters | property_uid invoice_uid |
|
|
Webhook Event | property_added Logs when a property is added. |
File | jomres_properties.class.php |
Jomres Plugin | core |
Data Object Parameters | property_uid |
|
|
Webhook Event | property_deleted Logs when a property is deleted. |
File | j04910deleteproperty.class.php |
Jomres Plugin | core |
Data Object Parameters | property_uid |
|
|
Webhook Event | property_published Logs when a property is published. |
File | j02272publishprop.class.php |
Jomres Plugin | core |
Data Object Parameters | property_uid |
|
|
Webhook Event | property_published Logs when a property is published. |
File | jomres_suspensions.class.php |
Jomres Plugin | core |
Data Object Parameters | property_uid |
|
|
Webhook Event | property_saved Logs when a property is updated. |
File | jomres_properties.class.php |
Jomres Plugin | [@webhook_event_plugin] |
Data Object Parameters | property_uid |
|
|
Webhook Event | property_settings_updated Logs when property settings are updated. |
File | functions.php |
Jomres Plugin | core |
Data Object Parameters | property_uid |
|
|
Webhook Event | property_unpublished Logs when a property is unpublished. |
File | j02272publishprop.class.php |
Jomres Plugin | core |
Data Object Parameters | property_uid |
|
|
Webhook Event | property_unpublished Logs when a property is unpublished. |
File | jomres_suspensions.class.php |
Jomres Plugin | core |
Data Object Parameters | property_uid |
|
|
Webhook Event | review_deleted Logs when a review is added. |
File | jomres_reviews.class.php |
Jomres Plugin | core |
Data Object Parameters | rating_id |
|
|
Webhook Event | review_published Logs when a review is added. |
File | jomres_reviews.class.php |
Jomres Plugin | core |
Data Object Parameters | rating_id |
|
|
Webhook Event | review_saved Logs when a review is added. |
File | jomres_reviews.class.php |
Jomres Plugin | core |
Data Object Parameters | rating_id |
|
|
Webhook Event | review_unpublished Logs when a review is added. |
File | jomres_reviews.class.php |
Jomres Plugin | core |
Data Object Parameters | rating_id |
|
|
Webhook Event | room_added Logs when a room is added. |
File | jrportal_rooms.class.php |
Jomres Plugin | core |
Data Object Parameters | property_uid room_uid |
|
|
Webhook Event | room_deleted Logs when a room is deleted. |
File | j06002delete_resource.class.php |
Jomres Plugin | core |
Data Object Parameters | property_uid room_uid |
|
|
Webhook Event | room_updated Logs when a room is updated. |
File | jrportal_rooms.class.php |
Jomres Plugin | core |
Data Object Parameters | property_uid room_uid |
|
|
Webhook Event | room_updated Logs when a room is deleted. |
File | jrportal_rooms.class.php |
Jomres Plugin | core |
Data Object Parameters | property_uid room_uid |
|
|
Webhook Event | rooms_multiple_added Logs when multiple rooms may have been added. Because multiple rooms have been added, the remote service is advised to completely refresh their rooms list. |
File | j06002save_normalmode_tariffs.class.php |
Jomres Plugin | core |
Data Object Parameters | property_uid |
|
|
Webhook Event | rooms_multiple_added Logs when multiple rooms are added. Because multiple rooms have been added, the remote service is advised to completely refresh their rooms list. |
File | jrportal_rooms.class.php |
Jomres Plugin | core |
Data Object Parameters | property_uid |
|
|
Webhook Event | tariff_cloned Logs when tariffs updated. |
File | j06002save_clone_tariff.class.php |
Jomres Plugin | clone_tariffs |
Data Object Parameters | property_uid |
|
|
Webhook Event | tariffs_updated Logs when tariffs updated. |
File | j06002save_tariff_advanced.class.php |
Jomres Plugin | core |
Data Object Parameters | property_uid |
|
|
Webhook Event | tariffs_updated Logs when tariffs updated. |
File | j06002save_tariff_advanced.class.php |
Jomres Plugin | core |
Data Object Parameters | property_uid |
|
|
Webhook Event | tariffs_updated Logs when tariffs updated. |
File | j06002save_tariff_micromanage.class.php |
Jomres Plugin | advanced_micromanage_tariff_editing_modes |
Data Object Parameters | property_uid |
|
|
Webhook Event | tariffs_updated Logs when tariffs updated. |
File | j06002save_normalmode_tariffs.class.php |
Jomres Plugin | core |
Data Object Parameters | property_uid |
First I will introduce you to Webhook Integration plugins in Jomres.
To create a webhook integration that talks to a remote service you will need to install a webhook plugin before you can create a Webhook integration.
By default there are already several Jomres Webhook Integration plugins available through the plugin manager, feel free to download them to understand how they work.
Install the Webhooks Authmethod Basic plugin now.
Visit the Property Manager's area in the frontend of your site. Once logged in you will see that you have a "Webhooks" option under the "Account Details" area of the Jomres Main Menu.
If you cannot see this option you may have disabled showing these options in the Site Configuration -> Misc tab, you will need to enable them first.
Once you are on the Webhooks page, you can create new webhook integrations, delete existing Webhook integrations etc.
For most Webhook integration plugins you would need to provide a url and authentication information, however there can be exceptions. For example, Jomres uses webhook functionality to update Beds24 (the Channel Manager) when tariffs have been changed. The Beds24 plugin creates its own Webhook which only has a name, because the remote url and authentication functionality is hard coded in the Beds24 plugin itself.
In this example I have chosen "Basic HTTP Authentication" in the Authentication dropdown.
I have provided a hypothetical url, and the plugin then requests the username and password required.
Now click Save, and you're done. Every time one of the Jomres actions listed on the Webhook Methods is triggered, then the remote service will be informed about the action occuring in Jomres.
Now that you’ve seen how a basic integration is set, you’re ready to create your own Integration Plugin. The script in the basic Integration that is actually triggered by the webhook watcher is j07310watcher_authmethod_process_basic.class.php so you can use that as an example to work from.
If you haven't already, I would encourage you to read the Webhooks Introduction so that you have an idea of what a Webhook Integration plugin does. If you are interested in creating Jomres plugins in general, then a good place to start is the Hello World plugin example.
This page does not teach you to code. Instead it is designed to give you the basics of a Webhook plugin's structure so that experienced developers can quickly create their own plugins for sending information from Jomres installations to remote services when certain activities are performed.
As a result I will skip looking at the code itself. If you want to make your own webhook plugin I recommend that you install the "Webhooks Authmethod None" plugin in the Jomres Plugin Manager, then you can compare this guide to the files, and potentially use that plugin as a foundation for building your own code. It's released under the GPL so you are free to copy and adjust those files as needed.
Like almost all Jomres plugins, functionality is provided through Minicomponents. For a summary of the Minicomponent trigger numbers, see this page on Github.
There are 4 files in this plugin. You could of course create your own class files if needed, but they might not be required.
All Jomres should have a plugin info script. See the Hello World example for more information on them.
This script is run whenever Jomres is run and it is used to include the language file in the /language/ sub-directory. It isn’t absolutely necessary, unless you plan to distribute the plugin to other Jomres users.
This script is used to tell the webhook page that a certain webhook exists, and what language strings and settings it uses. This information is used both on the New Webhook page and when you change the Authentication Integration dropdown on that page.
When an action is performed in Jomres, and Jomres finds that there is a Webhook Integration for that property's property manager, then the webhook handling is triggered, and the appropriate script is called to process the action.
This script is given the action's information and it's this script's responsibility to authenticate with the remote site, using the previously stored login information, and to send the body of the Webhook Event in whatever form that the remote service can use.
07310 scripts are processed immediately, whereas 07320 are treated as deferred tasks (more information below). Where possible I would strongly recommend that you use 07320 scripts. Debugging them is trickier but there is a shortcut (again, described below). This is because remote communications to other services might not be instantaneous and processing 07310 scripts could create a bottleneck whereas 07320 scripts do not.
Because a webhook's call to a remote service can be very time consuming, Jomres offers a 07320 trigger that communicates with remote services asynchronously. This allows the site visitor to continue doing something without needing to wait for the webhook to complete.
These tasks are then packaged up by the jomres_deferred_tasks class which writes a temporary file with the webhook's details to the temp data directory. Once that's done, then Jomres calls itself to tell itself that this new background task exists. The same jomres_deferred_tasks class will read in that file when Jomres receives the notification (j06000background_process.class.php) and triggers the 07320 that actually performs whatever the webhook is supposed to do.
Whilst this may seem a convoluted process, the reasoning for doing it is sensible. For example, when a tariff is updated in Jomres, a webhook is triggered to send the new pricing information to Beds24, if connected. Collecting and sending this information to Beds24 can take time and there's always a danger that the user could get frustrated while waiting for this to finish. When we use the background tasks method of calling ourselves then user activities continue as normal and the webhook tasks happen in an independent process that the user can't accidentally or deliberately prevent from completing.
This also means that arguably the webhook activities lag behind what the user has been doing, although typically only by a few seconds or so.
If you want to know if a webhook has been completed, check the Administrator > Jomres > Tools > Available logs > Webhooks.application.log. This should show you if and when the 07320 event was fired and any logging that you might create by adding the following to a webhook script :
logging::log_message("Blah blah was done" , 'Webhooks', 'DEBUG' );
As a developer, you may find yourself needing to debug a webhook's 07320 script. Rather than having to constantly trigger a webhook by doing something, potentially time consuming in Jomres, there is a shortcut.
Let’s assume that you have created a webhook plugin and have created the Webhook Integration in the Jomres frontend property manager's UI, you now want to test and or debug that the notification is going to the remote service.
First, put the site into Development mode (Administrator > Jomres > Settings > Site Configuration > Debugging tab). Once you have done that, the temporary files that are created and then deleted by the j06000background_process.class.php and jomres_deferrered_tasks scripts are not deleted after the webhook has been processed.
Next, perform the task that should trigger a webhook, for example create a booking, save a tariff etc.
Go to the Administrator > Jomres > Tools > Available logs > Core.application.log and in the search field you can enter something like this :
When you do that you'll see a list of calls to the background_process script. An example might look something like
http://localhost:80/joomla_portal/index.php?option=com_jomres&no_html=1&jrajax=1&Itemid=103&lang=en&task=background_process&payload_source=GiJxalSBOqqkAlPGiUIgvhJQhgWnonOoSkxzNOtCUvVLOzkWBa
You can now copy that url into your browser's address bar to trigger the actual 07320 script without needing to laboriously create bookings, change tariffs etc.
If you want to see what was passed to the webhook 07320 script then look in /jomres/temp/deferred_tasks for a file with the name of the payload source, eg GiJxalSBOqqkAlPGiUIgvhJQhgWnonOoSkxzNOtCUvVLOzkWBa You can open that file in a text editor to see its contents.
API functionality allows remote systems to access your Jomres database through "API Clients".
You could think of these as sub-accounts of your CMS account, ones which can be given individual rights (or permissions ). This allows third party systems to "talk" to the Jomres system. It provides a platform agnostic framework, enabling diverse applications such as mobile apps or other websites to pull information from your database in a way that is safe and secure for you.
Why does Jomres have its own REST API functionality, and not use the CMS’s REST API features?
The first iteration of Jomres’ REST API was created in early 2016, and has been steadily built upon ever since. Having our own functionality for the feature allows us to have documentation and API endpoints that are common to both CMSs without significant duplication of code. If it works in Joomla, it works in WordPress, and vice versa.
An API Client is a Client ID/Secret key pair that can be created by all registered users. This key pair is then used by remote sites to generate access tokens. Access tokens are sent with (most) REST API requests.
You can create and manage API key pairs in frontend > Jomres > Account Details > API Key management.
When you create an API Client you must give them permission to access certain features on the server. These permissions are called Scopes.
Any registered user of the website can create API Clients, however, normal guest users will not have access to property-related functionality.
The REST API uses the OAuth2 standard for giving Clients permission to access the system.
All available REST API Endpoints are available at https://api.jomres.net
Users can create REST API keys manually. You can also use the Implicit flow to redirect sites to the Jomres site so that remote sites can be given API key access.
Not all Jomres installations have the same endpoints available. To install an endpoint plugin go to the Jomres plugin manager and visit the API Features tab. Each of the plugins in the tab deliver endpoints.
Most endpoints demand that the client accessing them has been given rights to access their scope.
You can use POSTMAN to talk to the Jomres API.
Postman is an excellent tool that allows you to send API queries to your Jomres installation. If you'd like to test endpoints that already exists, or if you've added new endpoints, then this is a great way to test the code without having to build an entire app.
NB: The screenshots here are from an older version of Postman. One of the reasons I hate using screenshots from external services is because inevitably the user interface of the third party service changes, immediately rendering my documentation out of date. If you’re in any doubt about using Postman, please refer to their documentation.
In a nutshell, what you’re going to do here is use your REST API client id and secret to request a token (a long string of characters) from the server. Once you have requested that token, you can then send that token in the headers of your API request to the endpoint.
We'll start with a simple example, getting a user's favourite properties.
Here you can see the basic panel in Postman. The endpoint to get the user's favourites is /favourites/ ( trailing slash is important ), so to call Jomres from my localhost, and get the favourites for the user who created this API key set, you would set the method to GET, and the url to http://localhost/quickstart/jomres/api/favourites/
Before we can get the favourites, we first need to get an access token, so if you need to click on the Authorization tab, and choose OAuth2 from the dropdown.
Click "Get New Access Token", you'll see a popup like this. Give the token a name, set the url ( trailing slash! ) and enter the Client ID and Client Secret you created earlier. Next set the Grant Type to "Client Credentials". Finally, click "Request Token".
Now you'll see that the token has been pulled from the server and is available in the Authorization tab. I'll click "Localhost" and the token's details will appear to the right.
These are the token's details, complete with the scope that it supports. in "Add token to" change the dropdown to "Header" and then click "Use Token".
Ok, we're ready to get the user's favourites. Click "Send".
In the panel down below, you'll see the response, which is exactly as we expected.
Ok, that was a good first step. Let's now go ahead and test posting data to our server. We'll change the method to POST, so to send a new favourite property uid we'll first change the method to POST, and then add the id of the property we want to the end of the url, like this :
Again, you will need a token, so if you haven't already done that, get and use your token.
Ok, here are some of my favourites already. The "Some Camping Area" property is the property with id 7.
So now, when I click Send, this is the response I'll see in Postman.
And when I reload the page, here you can see that "Some Camping Area" has been added to my favourites.
API key management is done via the Account Details menu option. This option is available to any registered user, however a user's state will depend on what Permissions they can give to that client.
When an API client is created, a Client ID and Secret are automatically created for the client. These are what you will need to use when programming apps to talk to the Jomres API.
When you create a Client you must give them certain permissions, for example a simple Guests app would need to be able to read information about the guest, like their bookings information, modify their favourites etc. A more extensive app for property managers would need to be able to Get and Modify booking information.
Ok, so you've decided that you want to build an App on another website which will then call your Jomres installation to pull information out for display elsewhere. You've created an API client id and secret, so how do you use that to talk to Jomres?
First a little background.
Jomres uses the OAuth2 standard to provide limited access to functionality through a REST API which uses the HTTP protocol to communicate.
Many acronyms, much technical.
I've always found that the best way to learn is to find practical applications for a subject, so let's just dive right in and do that. Make sure that the client you've created has the right to Get the user's email address. If you're already familiar with using REST APIs, then you can probably just skip to the bottom of the example script.
Now, your Jomres installation is at https://www.example.com. Assuming that you're running Jomres 9.8 or later, then the path to the API is through https://www.example.com/jomres/api
On another server ( localhost is fine) create a script index.php, and in that put
$client_id = 'XXXXXXXX'; // Edit to use your own Client ID & Secret |
Next we'll create an array which will be posted to the server.
$data=array('grant_type' => 'client_credentials' , "client_id" => $client_id , "client_secret" => $client_secret); |
Then we'll send our request to the Jomres server to get our access token, which we'll need if we want to pull any information off the server.
$token_request = query_remote_server( $server , "" , "POST" , "/" , $data ); |
The token will be in the $response variable, so let's check it, and if it's set we can go ahead and use it to pull information from the server.
if (isset($response->access_token)) |
Now we can send our request for the email address
$result = query_remote_server( $server , $token , "GET" , "email" , array() ); |
And voila, if we dump the contents of $result then we'll have the email address.
If the client credentials were wrong, then you'll have something like
{"error":"invalid_client","error_description":"The client credentials are invalid"}
in the response.
The full script, with more error checking
$client_id = 'XXXXXXXX'; // Edit to use your own Client ID & Secret |
I have deliberately made it as simple as possible to create your own API plugins for Jomres.
The functionality your plugin supplies can be as simple or as complicated as you need it to be, but there are a few files that are required for it to run :
In the Favourites example I am using prepared statements. This means that the CMS and Jomres frameworks are not included by the API, which makes this particular endpoint extremely fast. The huge majority of Jomres endpoints however use this line
require_once("../framework.php"); |
Which includes both the CMS and the Jomres frameworks. It’s slower, however it means that we can use existing Jomres functionality like this
$basic_guest_type_details = jomres_singleton_abstract::getInstance( 'basic_guest_type_details' ); |
to perform complex tasks without reinventing the wheel.
Here is an example of what's in a scopes.json file.
{ |
_OAUTH_SCOPE_CATEGORY_USER refers to the parent category, currently this will either be _OAUTH_SCOPE_CATEGORY_USER or _OAUTH_SCOPE_CATEGORY_PROPERTIES ( "User permissions" & "Property permissions" ). This is purely for separating functionality in the Edit Client page.
Scope is important. In this example we've stuck with two simple descriptions "favourites_get" and "favourites_set", which means that only API clients that have been given permission to "Get favourites" can download the property uids that the user has set as a favourite. In theory you could have as many or as few scopes as you want, but we recommend you have at least one "get" scope and one "set" scope.
Any registered user can give rights to API Clients in the user "user_type" category, but only property managers can give API Clients "manager" access rights. There is also a user_type "super", which allows you to create functionality that's only available to Super Property Managers.
_OAUTH_SCOPE_FAVOURITES_GET & _OAUTH_SCOPE_FAVOURITES_GET_DESC refer to language strings that are stored in the language file that are included when you include a 00005 script with your plugin (see above).
There are several sub-directories, which is where the Jomres functionality will look for your API scripts. Ignoring the "language" directory where your language file(s) are kept, the directories are DELETE, GET, POST & PUT. If an app is sending a Delete request, then the script that is run will be in the DELETE directory. "The primary or most-commonly-used HTTP verbs (or methods, as they are properly called) are POST, GET, PUT, and DELETE. These correspond to create, read, update, and delete (or CRUD) operations, respectively." See http://www.restapitutorial.com/lessons/httpmethods.html
In Jomres 9.9.6 I added support for Authentication Free access to the REST API. This gives plugins the option to declare their endpoints as "authentication free" through an auth_free.json file.
The addition of this functionality opens up the scope of user access to your Jomres REST API by allowing anybody to search and retrieve information from your site, if you have the appropriate API Feature endpoint plugins installed.
Clients accessing an authentication free API feature ( such as Api Feature Search ) will not need to supply a Client ID/Secret keypair.
The auth_free.json file will need to contain
{ |
Users creating client id/secret pairs will not be able to select this auth free api features through the Client creation page, because it's automatically available to everybody.
Note : individual endpoints in api features can still restrict access through the use of
validate_scope::validate('xxxxxxx_get'); |
The script in this example would be run when a GET request is sent to the API www.example.com/jomres/api/favourites/
This is the endpoint in its entirety
Flight::route('GET /favourites', function() |
Let's look at the pertinent lines in the script to describe what they do :
defined( '_JOMRES_INITCHECK' ) or die( '' ); |
This ensures that the call to the API has come through the Jomres API index.php and doesn't get called by itself. It is a security feature.
Flight::route('GET /favourites', function() |
Jomres uses a micro-framework called Flight PHP ( http://flightphp.com/ ) because it's very small, fast and offers routing functionality. This example is basically a "route" script for Flight. To see the options that can be passed to a route, please see http://flightphp.com/learn#routing
validate_scope::validate('favourites_get'); |
Confirm that the client has the rights to access this scope.
$response = Flight::request_response(); |
Set up the response object.
$conn = Flight::db(); |
This calls the PDO object that's already been setup for talking to mysql.
The next few lines set up a prepared query for mysql to pull the user's favourites from the database. Describing this is outside of the scope of this article.
Flight::json( $response_name = "ids" , $property_uids); |
These lines set the value of the response, depending on whether or not any data was found. Generally you'll probably only want to send two responses, either the requested data or a 204 response code, which confirms that the script ran correctly, but there's no data to return. This is the data that's returned in the "Envelope".
Every response is contained by an envelope. That is, each response has a predictable set of keys with which you can expect to interact. The json response of the envelope typically looks like
{ |
So in this example the "data" section will have "ids" which in turn will be an array of property uids.
API responses consist of an object with two values, data and meta.
You can disable the Jomres envelope by setting X-JOMRES-NO-ENVELOPE in the header and setting its value to 1. When you do that, only the data section is returned by the Jomres REST API.
It is possible for Jomres scripts to call Jomres through the call_self class, like so :
$call_self = new call_self(); |
This assumes that the Client has Properties Get rights.
You don't want to constantly reinvent the wheel, Jomres already does a lot so to re-use the Jomres framework's code to do something you can call Jomres functions directly once you've included the framework code, like so
if (!isset($language)) |
For example, to use the search functionality we've done this
$_REQUEST['stars'] = $stars; |
which allows us to easily search by stars, as it returns a result that's easily manipulated in our own off-site code, the j06110ajax_search_composite is already capable of searching by stars.
> Jomres 10.7
Before attempting to use the Call Self functionality, you should use the API capability test first to ensure that Jomres can actually call local endpoints. Plugins like adminTools can impose very restrictive access to sub-directories, which can prevent Jomres from calling its own endpoints (and other sites calling in via the REST API).
In 10.7 a new class was included that allows you to test whether or not Jomres is able to perform API calls. If it returns false you should not attempt to call self because errors will likely be thrown.
jr_import('jomres_api_capability_test'); |
Another new feature added in 10.7 is the ability for plugins to have local tokens.
Local tokens allow plugins to create tokens that can be used by the UI to call local endpoints. One example of a plugin that would use local tokens is the Jomres Messaging System.
The messaging system is in fact a suite of different plugins, which use local endpoints
Here’s an example of how it’s used, from the Channel Management Framework plugin.
jr_import('jomres_local_tokens'); |
The token is then added to the Local Tokens showtime array so that the user will not see and/or be able to remove/edit them through the API key management page.
// Local token plugins cannot be removed or viewed by the native api view/edit functionality |
A minicomponent can then use the local token by doing something like
$output['TOKEN'] = $thisJRUser->params['jomres_local_cmf_ui_token']; |
This allows the UI to use REST API endpoints, instead of querying functionality directly.
The purpose for this is that a plugin can be used either for testing local endpoints, or for developing functionality that can be used by both the local UI, and remote callers to the REST API. It negates the need for the UI plugin developer to build two different sets of functionality, instead the plugin’s UI can use ajax to perform the same queries as a client accessing the endpoints.
The Jomres Messaging System is a good example of how this is done because the messaging system uses REST API endpoints almost exclusively. The local tokens are still restricted in the same way as tokens created in the API key management system, so scopes and token expiry are still respected. It’s possible therefore for a mobile app developer to use the same set of endpoints as the JMS plugin uses, to communicate through the JMS with property managers.
Here I will describe how the REST API and Webhooks can be used together to build a web service.
This functionality is very ambitious, to date I'm not aware of any other self hosted booking portal for either Joomla or Wordpress that includes it. It sets Jomres apart from its competitors because it offers features that, until now, could only be enjoyed by the big SaaS booking businesses.
Both features saw considerable development in the second half of 2016, and as is always the way, development outpaces documentation. As a result, I will describe a case study of how these features can be used. First however I need to introduce you to the features, describe what they're intended for and any pertinent information I feel you'll need.
Webhooks and the REST API should be considered two sides of the same coin.
This all sounds very complicated, so let's simplify it somewhat
I will not go into great detail here about security as it's discussed elsewhere in the manual. The important point to note is that Webhook configurations are assigned to property managers, not property uids. This is worth remembering as previous plugins in Jomres were tied to specific properties, but these features are instead linked to manager ids. This means that Webhook authentication is checked against the property manager/property uids cross reference table.
In Jomres, Super Property Managers are not typically given access to individual properties, instead they're automatically given access to all properties. Super Property Managers therefore usually don't have a record in the cross reference table for a given property. As a result, if a Super Manager creates a webhook then that webhook might not be triggered.
When working with the Webhooks, make sure that the user creating Webhooks is a "normal" property manager.
To clarify this, the current version of the Webhooks feature doesn't offer the Webhook configuration option in the menu to Super Property Managers.
REST API features are semi-restricted, it depends on the feature. For example, in this case study we'll use the API Features Webhooks plugin to answer callbacks from a remote service that's been notified of a change to a property in Jomres. That particular plugin checks to ensure that the manager who created the REST API keys has access to the properties being called, however there's an API Feature called "Search" which is a super property manager only API feature and isn't tied to any specific properties. That particular feature, however, doesn't offer any POST functionality, it's purely a search mechanism.
One thing I've learned over the years of working on Jomres is that not everybody wants everything on offer. For this feature some people will only want the REST API framework then they'll develop their own code to make use of that framework, others want everything handed to them on a plate, and others want to selectively choose what to use.
As a result, the REST API/Webhook framework has been designed to be modular, deferring to related plugins to provide the bulk of their functionality.
Both frameworks require installation of the API Core and Webhooks Core respectively.
As previously mentioned, many of our users are developers who use Jomres as a foundation that they can use to build their own unique sites. They're skilled programmers in their own rights and Jomres is just a building block on the path to that goal. We encourage this and much of the functionality available should be considered as "sample" code on how to do things the right way in Jomres. The REST API/Webhook functionality is no different. There are so many different PMSs and Channel Managers out there, it's impossible for us to write integrations for all of them, so it's my philosophy that it's better to give developers the tools to achieve those integrations in the minimum amount of time possible.
In this case study we will show you how to set up an installation of Jomres to send Webhook notifications and allow a remote server to respond to those calls.
You will need to install the REST API Core, API Feature Webhooks ( which is designed as a companion to the Webhooks feature, but can be used by any authorised remote service ) and the Webhooks Core plugins.
If you're using this feature for the first time and are just experimenting then you'll probably benefit from visiting our Public Snippets repository on Github and downloading the Simulation Webhook Responder. This simulation code is designed to receive a notification from Jomres, then to call Jomres' REST API back to request the full details of the change. In reality remote services would selectively decide if the API Feature Webhooks endpoints are the relevant endpoints to call in the event of the notification, depending on their own particular setups, but for education purposes this is how we'll do it here.
In my installation of WAMP Jomres resides in /www/joomla_portal/ so I'm going to copy the directory contents of simulation_webhook_responder into /www/simulation_webhook_responder This set of scripts will act as a receiver of Webhook calls, and automatically trigger calls back to the Jomres REST API to find out the details of the change that it was notified about.
In practice, the webhook responder would in fact be a remote service, such as a Property Management System's gateway or a Channel Manager's API. As it's impossible to predict how the data will actually be used by the far end, we're going to just receive calls and send them back to Jomres API to confirm that everything's working as expected.
All this stuff happens out of sight of a user so it can be tricky to track what's happening. To monitor what the webhook responder is doing I use a syslog application for Windows called "Visual Syslog Server for Windows". If you have your own tool for monitoring syslogs use that, or Visual Syslog. We'll get to configuration for connecting to it in a moment.
For the purposes of this case study I'm going to assume that you're running the Joomla Portal Quickstart, as that's the most likely setup that will be used. You can do this on one of the other flavours of Jomres Quickstart, it doesn't need to be one of the Quickstarts either, any Jomres installation will do. Screenshots here however will be from the Quickstart Portal.
In this article I will assume that you're reasonably familiar with Jomres. I'll show you relevant screenshots so that you can ensure that you're following the steps as described, but on the whole you shouldn't struggle too much.
First visit the Jomres Plugin Manager and install the API Core, Api Feature Webhooks, Webhooks Core and Webhooks Authmethod None plugins.
Now go to Site Configuration and configure it so that the webhooks and API menu options are available through the frontend.
Next, create a new user in the Joomla ( or Wordpress ) user manager. I'll create mine and call them "manager".
I'll use the Jomres user manager to make them a property manager, and give them access to Fawlty Towers and Best West Hotel ( property uids 1 & 2 respectively ).
Now that you've done this, you should see some new options under the Account menu option in the frontend manager's toolbar :
API key management is the link that you use to access the REST API configuration page where API keys are created. Webhooks is the link for Webhook configuration. We'll start off by creating an API key pair.
Click on API key management and click New. The Client ID and Secret are created for you. Make sure that you click the checkbox next to "Get data as part of a webhook communication", as this gives the App client rights to use the API Webhook Feature's functionality.
Save the key pair, and again in the Accounts menu click Webhooks and click New. Set the URL to http://localhost/simulation_webhook_responder/ and click Save.
You're almost ready to start testing, but first we need to configure the responder script. Go into the simulation_webhook_responder directory in your WAMP/XAMPP/MAMP/LAMP public_html directory and open config.php.
Assuming you've installed Visual Syslog, then you can probably leave the settings for that alone. In the Client ID and Secret fields, copy and paste the Client ID and Secret from the API key management -> Edit page into this document. The responder will need to know these details so that it can send requests back to the Jomres installation to pull the full details of the changed record.
The trailing slash in the server's url is important, don't forget it.
Save the document and close it.
At this point we could start testing, but that would mean performing a lot of activities to trigger the webhook code built into Jomres. Fortunately, we don't need to do this, we can artificially trigger webhooks. Go back to our Github repository for the responder, and there you'll see a file called j00005fake_webhook_calls.class.php We can use this file to trigger webhook calls to happen every time a Jomres page is loaded.
Copy this file into your /jomres/remote_plugins/custom_code directory ( create the directory if it doesn't already exist ) and rebuild the registry. From now on, until you delete this file it'll run every time a Jomres page is loaded.
Open it in your editor and you'll see lots of ids. Here you'll need to do some of your own legwork, as every system is likely to be different. You'll need to identify contract ( booking ) uids, invoice uids etc as they exist on your own installation.
Once you've modified this file and added your own Ids, then scroll down further, you'll see a variety of webhook triggers. Make sure they're all commented out, then uncomment
$webhook_event = 'booking_modified'; |
When you next visit any page in Jomres ( e.g. the Dashboard ) the webhook notification should appear in Visual Syslog and look something like this. Double click the last line to see the popup which will contain the actual details of the response. You do not need to be logged in as a manager for this to happen.
You can now go ahead and comment this section, and uncomment others in j00005fake_webhook_calls.class.php to continue testing.
This functionality is the foundation of a new way of working with Jomres. As the Internet of Things evolves, applications like Jomres need to evolve to keep pace. Allowing remote services to interact automatically with Jomres without going through a web browser makes Jomres accessible to an uncountable variety of outside devices and services, anything from Channel Manager services to mobile apps to Property Management Systems, CRM systems and other things we haven't even thought of yet.
Jomres and you, forging ahead into the future together.
Do you want to access the Jomres functionality through a simple, well documented API? You can, easily, using the REST API.
The API is well documented here, and it provides you with a significant amount of flexibility to manipulate the system, but did you know that you can also access the API from within the same server?
Let's say that you're building a feature for your client, it's in another component/plugin on the same server. You want to access some Jomres data without making any changes to Jomres Core files. Here's how you do it.
/** Create definitions */ |
The "system" user is a special REST API user that allows the system to call any installed REST API feature, see
If you need to send headers, you can do something like
$headers = array ( "X-JOMRES-channel-name : ".$channel_name ); |
And to POST data you could do something like
$post_data = array ("params" => json_encode($data_object) ); |
to build the POST data.
When you inspect (or dump) the content of the result you will see something like :
object(stdClass)#4112 (2) { |
The REST API test tool in Wordpress says that I have to move files before I can use channel management features, why?
The correct location for Jomres files is in the /public_html/jomres/ directory, and the REST API routing requires that location for it to function correctly.
In recent years many Wordpress hosting services have started making it so that plugins cannot write directly to the /public_html directory. To resolve this Jomres can install its core files into the /wp-content/plugins/jomres/jomres directory and it will work fine except for the REST API.
If you need to use the REST API, using FTP or a file manager you need to move the files in the /public_html/wp-content/plugins/jomres/jomres/ directory to the public_html/jomres directory then empty the /public_html/jomres/temp/ directory.
Important : do not move any other files from the /public_html/wp-content/plugins/jomres/ directory. Directories like "admin", "includes" , "public" and files like "jomres.php", "index.php" etc should remain in the same place, only the files under /jomres/jomres should be moved.
Once you have made this change, double check the REST API test page. It should confirm that you can use the REST API now.
The Jomres Quickstarts are already set up with Jomres in the correct location. If you’re struggling with any of this, please do consider installing them instead.
There are a number of reasons why the REST API test might fail.
It may well fail with a 500 error. To determine the cause you will need to check your PHP error log.
A number of settings you can try are as follows.
In your .htaccess in the root of your CMS's installation (typically /public_html/), try adding the following :
RewriteRule .* - [E=HTTP_AUTHORIZATION:%{HTTP:Authorization}] |
If you are calling your server through Postman or CURL on the command line and you're seeing the message "'No authentication is provided. Bearer missing from headers?" then it's possible that you will need to modify Apache's configuration a little. To resolve this on my own server I logged into WHM as admin, Service configuration > apache configuration > Include editor and created a Pre Virtual Host include with the following :
SetEnvIf Authorization "(.*)" HTTP_AUTHORIZATION=$1 |
and then restarted apache.
Before I answer that, I want to give you a quick rundown on the template system. It’s not like other systems you might be used to, so a basic primer is in order.
Look at top.html. It is called in this script
The line that adds the property name is
$output[ 'PROPERTYNAME' ] = jr_gettext( '_JOMRES_CUSTOMTEXT_PROPERTY_NAME_'.$defaultProperty , $current_property_details->property_name , false); |
And in the template file it’s used like this :
{PROPERTYNAME}
NB: The array index in the script ( $output[ 'PROPERTYNAME' ] ) doesn’t have to be capitalised, I use that as a convention to make it immediately obvious to me which array indexes will be used in template files. {PROPERTYNAME} in the template file itself, has to be capitalised.
Note, strings don’t always need to be added to the calling script. See the new Importing Strings feature that arrived in Jomres 10.6
On L25 it says
<patTemplate:tmpl name="rows" ….
The rows array is populated here
Because the “rows” array has (probably) got more than one record in it, the template system loops through that array to show all of the bookings.
Not all variables that populate multiple rows are called $rows.
Take a look at this template file
This is the template file that is used to generate the property display in most of the plugins that display properties on landing pages etc, for example the isotope and the property grid plugins both use this template.
This Jomres template file uses Bootstrap 5 for displaying output. There are several lines that include the class text-truncate
<div class="col-sm-12 fs-6 fw-lighter text-truncate"> |
There are times when a property name is too long for the available space, therefore the text-truncate class from Bootstrap 5 is used so that the name can still be shown but the longer property names don’t break the layout of the cards on the page.
It may be that you’re including this output on pages where this isn’t an issue for you, so you could remove that if it’s a problem for you.
You now know where template files are typically stored (more on overrides later), how dynamic content is added to those template files, and how Bootstrap 5 markup is used to fine tune the layout.
The first rule to understand when editing Jomres templates is, if the data isn't available to the template then you can't show it, however there may be times when the template file you're using has data available to it but it's just not showing it. How do you find out?
If you visit the basic_module_output.html template file you will see a comment which demonstrates that there’s some content that could be output by the template file, but isn’t currently. Not all template files have this commentary, however.
The easiest way is to go to the Site Configuration -> Debugging tab and set "Dump Template Vars" to "Yes". This will change how templates are output in the front end, and is a great way of identifying which template file is producing some output. If you hover over the file name, you'll see a list of all elements that are available to that template. This approach isn’t flawless, however. There are times when templates are so nested within templates that it just isn’t shown.
Another way of looking to see what’s currently available to a template is to dump an array’s contents to see what’s in it. For example in the top template script I could add
var_dump($pageoutput);exit; |
Before the line that says
$tmpl->addRows('pageoutput', $pageoutput); |
Then, when I reload the page that the template file is used in I would see something like
array(1) { |
I would then know that I could use {VIDEO_TUTORIALS} somewhere in top.html template file so long it was inside the section that says
<patTemplate:tmpl name="pageoutput" unusedvars="strip"> |
If there were another section that said
<patTemplate:tmpl name="another_array_name" unusedvars="strip"> |
Then I probably couldn’t use {VIDEO_TUTORIALS} inside that because the "another_array_name" array has different content.
Jomres template files can be found in a number of different places due to template override and template package features, so how do you find which template you need to edit to change the layout?
In Site Configuration, go to the Debugging tab. At the bottom there is an option called Dump Template Vars. When this option is set to Yes, the frontend templates will have their output modified to look something like this. As you can see from the image, the full path to the template file and the template file name itself is displayed. Additionally, if you hover over the path with the mouse then the names of the variables that can be used in that template are shown.
The patTemplate templating system is an old library which is no longer supported or maintained by its original creators. Normally this is a bad thing for most libraries and I'd consider moving over to a new library, but with patTemplate I’ve decided to not do that, and instead I've added some of my own functionality to the library.
The most obvious of these are the "Common strings", which are strings that we add to every template that's parsed by the patTemplate class, meaning that they don't need to be added programatically by the calling script. You can see the strings by visiting the administrator area, Jomres Developer Tools area, Common Strings menu option, if the plugin is installed
If you're a developer who's modifying templates and finds yourself adding strings to every template, you can programatically have your own common strings. Open the file j00005x_create_misc_common_strings.class.php in the /jomres/core-minicomponents directory to see an example of how we do it. You can create your own 00005 script to perform the same function.
You cannot normally include language definitions (such as _JOMRES_COM_MR_QUICKRESDESC ) without first declaring it in the calling script. In 10.6 a new feature was introduced that changes that.
Most Jomres patTemplate template files have this code for each array it works with
<patTemplate:tmpl name="pageoutput" unusedvars="strip"> |
You can now use a different unusedvars definition like so :
<patTemplate:tmpl name="pageoutput" unusedvars="import"> |
When this setting is set to “import” then Jomres will attempt to find a language definition when it comes across items like {ABCDXYZ} in the markup but not a corresponding index in the array it’s looping through. If it does, it’ll attempt to use jr_gettext() to find language definitions. Now if a template is allowed to import, any usage of {_JOMRES_COM_MR_QUICKRESDESC} would result in the current language’s contents to be shown, so if I’m using English, then it would output Quick reservation in the page.
Not all Core templates will be changed to use this as it may result in unexpected behaviour however new templates and revised templates may well use this going forward, as needed, on a case by case basis. You, however, can use this feature.
This is a quick clarification on how Jomres itself is licensed.
Previous to December 2009 Jomres was licensed under a proprietary licence restricting the number of servers you could install Jomres on.
As of the first of December 2009 all versions until further notice are now dual-licensed under the GNU/GPL V2 and MIT licence, choose whichever suits your circumstance best.
Developers, If you're considering writing a Jomres plugin, be aware that we do not consider software that uses Jomres functions or classes to be derivative of Jomres. This means that you can licence your plugins in any way that you wish.
For the most uptodate copy of the licence, see https://www.jomres.net/license
This is a series of notes to indicate what each of the files in the gateway plugins do.
On Github you can find an example payment gateway for Jomres.
The components of a payment module in Jomres:
j00509_GATEWAYNAME_.class.php
j00510_GATEWAYNAME_.class.php
j00510_GATEWAYNAME_.gif
j00510_GATEWAYNAME_.html
j00600_GATEWAYNAME_.class.php
j00600_GATEWAYNAME_.html
j00605_GATEWAYNAME_.class.php
j00610_GATEWAYNAME_.class.php
j03108_GATEWAYNAME_.class.php
Obviously _GATEWAYNAME_ is substituted with the name of the gateway in question. Gateways are only triggered at the Confirm Booking stage when the user doing the booking is not an authorised manager.
j00509_GATEWAYNAME_.class.php
Purpose: To acknowledge existence of the module to the configuration panel "gateways".
Notes: When the gateways config panel is generated this file is called. It generates the link seen in the config panel that is clicked to enable the gateway module configuration popup.
j00510_GATEWAYNAME_.class.php
Purpose: Compiles configuration options that the user can edit.
Notes: N/A
j00510_GATEWAYNAME_.gif
Purpose: The gateway image
Notes:N/A
j00510_GATEWAYNAME_.html
Purpose: patTemplate file used when generating module configuration popup
Notes: N/A
j00600_GATEWAYNAME_.class.php
Purpose: 00600 plugin interrupt.
Notes: function showBookingConfirmation in jomres_bookingroom_functions.php lists active gateway plugins. When a gateway is chosen and the customer clicks submit to proceed to payment the module designer is able to program an 'interrupt' that will be triggered before the customer is sent off-site to perform payment. This enables data collection that the system has not collected elsewhere that the module specifically requires. This file is optional, if it doesn't exist then Jomres will skip it and go straight to the 00605 eventTrigger.
j00600_GATEWAYNAME_.html
Purpose: patTemplate file for generating input/output for j00600 class file.
Notes: N/A
j00605_GATEWAYNAME_.class.php
Called by: jomres.php
Purpose: Sends any required postage data to payment gateway, eg paypal. and redirects the user to the payment gateway's interface.
Notes: Is triggered after 00605, or if 00605 doesn't exist then is called straight away.
j00610_GATEWAYNAME_.class.php
Purpose: Is called by payment gateways confirming receipt of payment, and when customers are redirected back to the jomres site after payment.
Notes: It is worth noting that the payment data is still only stored in the temporary session data at this point. It is only when the insertInternetBooking function is specifically called, normally by this file but there are other places it can be called, that the booking is transferred from the temporary data to the contracts table. If the process is not completed then the booking is technically lost. Available but liable to be overwritten if the guest should return to the booking form). Also note that in some cases this file may be optional, eg. the cheque (or offline payment) module doesn't use it, the insertInternetBooking function is called by 00605cheque.class.php as there's no extra processing required.
Because the temporary data is stored in session variables it's not unheard of for Paypal's IPN to take so long returning it's information that the session has expired and the data lost, therefore it's advised that you up the Joomla session timeout from the pretty short timescale configured by the CMS's to something a little more reasonable. I can't suggest what's reasonable because that's down to you to decide what's best, but I wouldn't be surprised if many people set their timeouts to an hour or more.
j03108_GATEWAYNAME_.class.php
Purpose: Reports file path to the calling function.
Notes: Provides the calling function with the path to the gateway gif.
If you do
$tmpBookingHandler =jomres_getSingleton('jomres_temp_booking_handler'); |
and do
var_dump($tmpBookingHandler->tmpguest);exit; |
you'll see that you've got access to all the guest's details there.
In your 610 file, please make sure, after you've confirmed the payment was successful, use this line :
$tmpBookingHandler->updateBookingField('depositpaidsuccessfully',true); |
before you do the insert otherwise Jomres will mark the deposit as unpaid.
Finally, don't attempt to clean up any data stored in $tmpBookingHandler unless you specifically put it there yourself (you probably won't need to), I had another gateway developer do the same and it caused Jomres to behave in some very weird and wonderful ways until I took it out. Jomres will clean up that variable itself in the "insertInternetBooking" function.
In Jomres 9 I introduced functionality that allowed invoices balances to be paid, as well as paying for bookings, which requires some changes to payment gateways if gateway developers wish to support this functionality.
Existing booking payment functionality is not affected, you can treat this as code that is independent of booking payments.
j10509paypal.class.php
Example :
$plugin = "paypal"; |
Allows the gateway to be listed in the administrator area List Gateways page.
j10510paypal.class.php
Builds the settings that are used to build the administrator area gateway settings page.
Example :
$settingArray['client_id'] = array ( |
There are two more files, which actually send and receive to the remote gateway servers. Their file names should always be as follows :
invoice_payment_send.class.php
invoice_payment_receive.class.php
They're used to send and receive information from the remote gateway, the file names should be self-explanatory. They are passed an object that contains information about the invoice, ( $invoice_obj ), the payment reference ( required to allow us to cross reference invoice ids and the processing gateway plugin ) , the value of the invoice plus the invoice line items. It also contains the specific gateway's settings as that were saved in j10510paypal.class.php.
If you're in any doubt, it's always best to look at how the Core Gateway Paypal does things, as it contains all of the code mentioned above.
The Media Centre for Jomres has been written from the ground up to be completely plugin friendly, meaning that other plugins can use the uploading functionality if they include the appropriate minicomponents.
Here I will add notes as a guide to which minicomponents do what.
You can upload images for Property Main Image, Slideshow images, Room features, Optional Extras and Room images.
This functionality is accessed via the frontend under the Media Centre menu option. In the administrator administrator area look in Settings > Media Centre. For the purpose of this document, I will focus on the files used by the Media Centre in the frontend.
Property centric images are all uploaded to the uploadedimages directory under /jomres, then to a subdirectory of the resource type, then finally an identifying ID. Because resources like the main property image and the slideshow don't have resource IDs, their ids are always 0. So, for example slideshow images for a property with the id of 15 will be uploaded into /jomres/uploadedimages/15/slideshow/0/ whereas images for the hypothetical room with an id of 34 will be uploaded to /jomres/uploadedimages/15/rooms/34/.
It will probably help you to look at the source of the individual files as they're mentioned here so that you can see the code in context.
The first file required by an external plugin is the 03379 trigger file, for example j03379slideshow
The sole purpose of the 03379 files is to tell Jomres that a particular resource type exists, and a few things about that resource type. For example j03379media_centre_resource_type_slideshow returns an indexed array :
$this->ret_vals = array( |
The resource_type will be used for validation of the type and to make the subdirectory under /jomres/uploadedimages/15/, to tell Jomres if it needs to look for an individual id for the resource, and its translated, friendly name.
In the properties context, this refers to the root of an individual property's images, which here is
JOMRES_IMAGELOCATION_ABSPATH . getDefaultProperty() . JRDS |
The first is a constant that resolves to /xxx/public_html/jomres/uploadedimages/
Next we have a built in Jomres function that will find the manager's active property id.
Finally JRDS is another constant, and stands for JomRes Directory Separator (ie. \ in linux, or / in windows).
In the properties context, this refers to the url of an individual property's images, which here is
JOMRES_IMAGELOCATION_RELPATH . getDefaultProperty() . '/' |
The first is a constant that resolves to /jomres/uploadedimages/
Next we have a built in Jomres function that will find the manager's active property id.
This can be either true or false. So if you want images in paths like this : /uploadedimages/15/rooms/34 or /uploadedimages/15/slideshow/0 , then use true.
If this is set to false, as in the case of property features, then Jomres will not create further subdirectories, instead it will just upload images to, for example, /uploadedimages/pfeatures or /uploadedimages/rmtypes
The 03381 is called via ajax when a user changes the resource type that they're uploading images for in the Media Centre. The purpose of this is to allow us to show a dropdown list of resource ids if necessary. As already mentioned, slideshows (and the main property image) don't use a resource id, but rooms do. So for example j03381slideshow doesn't do anything so returns an empty string, but j03381rooms returns a dropdown with a dropdown list of room numbers and names. This allows the manager to upload multiple images for individual rooms.
This trigger is used for post uploaded processing, so it's triggered after an image has been uploaded. For example, j03382slideshow was emptying the /jomres/uploadedimages/15/gifs/ directory, then built a new copy of the slideshow gif which was commonly used in the property list (i.e search results) and module popup. Now the gif has been replaced by a slideshow, but the code is still there commented, so you can use it as an example.
This is used to find the existing images for a given context, which are then returned as an array. With this array, Jomres can build the existing images column which a user can use to view or delete existing images.
If you're a developer and have a new property resource that you'd like to upload images for, then these triggers are likely all that you'll need.
By default, Jomres only supports uploading of jpg and png images. Whilst you could probably upload other types of resources, that functionality hasn't been tested and we recommend that you only implement uploading of other types at your own risk, and after exhaustive testing. Also, you should read the File Uploader's security notes.